Difference between revisions of "Landscape Edit"
Jump to navigation
Jump to search
| (One intermediate revision by the same user not shown) | |||
| Line 1: | Line 1: | ||
This tool is used to modify the terrain, textures, and vertex colors of the game world. It can be accessed by going to '''WORLD''' -> '''Landscape Editing'''. | This tool is used to modify the terrain, textures, and vertex colors of the game world. It can be accessed by going to '''WORLD''' -> '''Landscape Editing'''. | ||
See also [https://ck.uesp.net/wiki/Landscape Landscape]. | |||
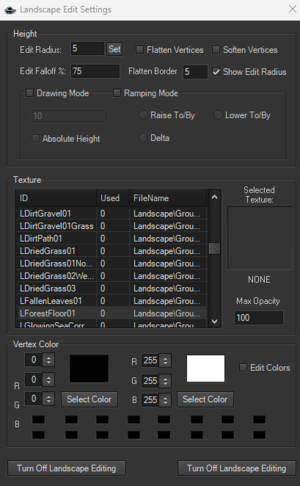
[[File:Landscape Edit.png|none|thumb]] | [[File:Landscape Edit.png|none|thumb]] | ||
Latest revision as of 18:55, 4 October 2024
This tool is used to modify the terrain, textures, and vertex colors of the game world. It can be accessed by going to WORLD -> Landscape Editing.
See also Landscape.
1. Height Section:[edit | edit source]
This section allows you to modify the landscape height (terrain elevation) and includes several tools for shaping the landscape.
- Edit Radius: Controls the size of the area affected by terrain editing tools. You can enter a value (in this case, it's set to 5) and click "Set" to apply.
- Flatten Vertices: When selected, this will make the vertices in the editing area equal in height, effectively flattening the terrain.
- Soften Vertices: This option smooths out the terrain by softening sharp edges between vertices.
- Edit Falloff: Controls how the effect of terrain editing fades off from the center of the tool's radius (in percentage). A lower percentage creates sharper transitions, while a higher percentage smooths the changes more gradually.
- Flatten Border: Helps smooth the terrain around the edges of the area you're editing.
- Show Edit Radius: Displays the area of effect as a visual circle or shape over the terrain when editing.
- Drawing Mode / Ramping Mode:
- Drawing Mode allows you to manually raise or lower terrain.
- Ramping Mode allows you to create slopes by defining start and end heights.
- Raise To/By and Lower To/By: These tools allow you to raise or lower terrain by a specific height or to a specified level.
- Absolute Height: When checked, terrain modifications will be made to a fixed height, ignoring the current terrain elevation.
- Delta: This option controls the rate or magnitude of terrain changes, useful for gradual elevation or lowering.
2. Texture Section:[edit | edit source]
This section manages terrain textures, allowing you to paint specific textures onto the landscape.
- ID: Displays the unique identifier for each texture.
- Used: Indicates how many times a texture is currently applied in the world.
- FileName: The path to the texture file in the Creation Kit’s directories.
- Selected Texture: This is the currently selected texture for painting. The right panel will show a preview of the texture, and you can adjust its settings.
- Max Opacity: This slider controls the opacity of the texture being applied, allowing for blending with other textures.
3. Vertex Color Section:[edit | edit source]
This section allows for the adjustment of vertex colors, which is useful for adding color variation and blending to terrain textures.
- R, G, B (Red, Green, Blue): These are the RGB color sliders to select the vertex color to be applied.
- Select Color: Opens a color picker to choose custom colors for terrain vertices.
- Edit Colors: When checked, you can directly paint vertex colors onto the landscape.
- Color Presets (Squares): Preset color slots that allow you to quickly select or store frequently used colors.
4. Buttons:[edit | edit source]
- Turn Off Landscape Editing: These buttons are used to disable landscape editing mode when you're finished making changes.
