Difference between revisions of "Creating Custom Doors for Fallout 4"
imported>Fireboyd78 |
imported>Qazaaq (centered images) |
||
| Line 26: | Line 26: | ||
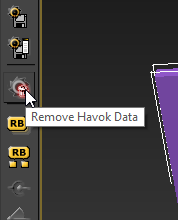
Again, if you've imported a vanilla nif then you'll need to remove all Havok data from it before proceeding, you can do this with the "Remove Havok Data" button on the Havok toolbar or from the text menu (Havok Contents Tools > Remove Havok Data.) You can also show the Havok toolbar from here, if it's hidden ("Show Toolbars" option.) | Again, if you've imported a vanilla nif then you'll need to remove all Havok data from it before proceeding, you can do this with the "Remove Havok Data" button on the Havok toolbar or from the text menu (Havok Contents Tools > Remove Havok Data.) You can also show the Havok toolbar from here, if it's hidden ("Show Toolbars" option.) | ||
[[File:F4_Custom_Doors_01.png| | [[File:F4_Custom_Doors_01.png|thumb|center]] | ||
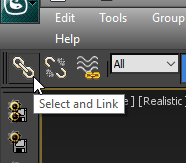
Your doors can be made of multiple objects, just make sure they're all linked to one central "Parent" object, best to use the biggest part of your door for this role. To do this, select the "Select and Link" button on your main toolbar, select the object you want to link to the main part of your door (for example, your doorknob, this is going to be a "Child") then click and drag to the main part of your door (this will be the "Parent"). When you release your click, you should see your "Parent" object briefly be selected, this is showing you it has worked. To keep track of your links you can go to Graph Editors > New Schematic View in the text menu, this will pop up a window which shows you how your objects are linked. | Your doors can be made of multiple objects, just make sure they're all linked to one central "Parent" object, best to use the biggest part of your door for this role. To do this, select the "Select and Link" button on your main toolbar, select the object you want to link to the main part of your door (for example, your doorknob, this is going to be a "Child") then click and drag to the main part of your door (this will be the "Parent"). When you release your click, you should see your "Parent" object briefly be selected, this is showing you it has worked. To keep track of your links you can go to Graph Editors > New Schematic View in the text menu, this will pop up a window which shows you how your objects are linked. | ||
[[File:F4_Custom_Doors_02.png| | [[File:F4_Custom_Doors_02.png|thumb|center]] | ||
You can also make double doors, just follow every process normally making sure you give both doors collision individually. There will be some extra steps you need to take when we get to the animation manager phase. Both doors still need individual keyframed animation. | You can also make double doors, just follow every process normally making sure you give both doors collision individually. There will be some extra steps you need to take when we get to the animation manager phase. Both doors still need individual keyframed animation. | ||
| Line 54: | Line 54: | ||
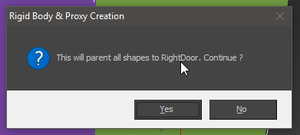
Select your pair of objects (the visual mesh of the object and the custom collision object you've made) and go to Havok Contents Tools > Physics > Create Rigid Body With Proxy(s), '''it's very important that when 3ds pops up the dialogue box it's showing the name of your visual object, otherwise the roles of your visual mesh and collision will be reversed. If the name of your collision object pops up, click "No."''' It can take a few tries de-selecting and re-selecting before you get the right mesh to show up in the dialogue, try different orders of selection. If it shows the name of your visual mesh, click "Yes" and we'll move on to the next stage. | Select your pair of objects (the visual mesh of the object and the custom collision object you've made) and go to Havok Contents Tools > Physics > Create Rigid Body With Proxy(s), '''it's very important that when 3ds pops up the dialogue box it's showing the name of your visual object, otherwise the roles of your visual mesh and collision will be reversed. If the name of your collision object pops up, click "No."''' It can take a few tries de-selecting and re-selecting before you get the right mesh to show up in the dialogue, try different orders of selection. If it shows the name of your visual mesh, click "Yes" and we'll move on to the next stage. | ||
[[File:F4_Custom_Doors_03.png| | [[File:F4_Custom_Doors_03.png|thumb|center]] | ||
From here on out, you'll follow the simple method but your "Rigid Body" modifier will be on your visual object and your "Shape" modifier will be on your collision object. Selecting your collision object should allow you to edit "Collison Group" properties, we'll get to that further down. | From here on out, you'll follow the simple method but your "Rigid Body" modifier will be on your visual object and your "Shape" modifier will be on your collision object. Selecting your collision object should allow you to edit "Collison Group" properties, we'll get to that further down. | ||
| Line 66: | Line 66: | ||
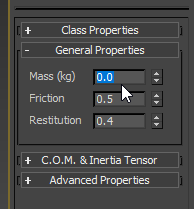
With the "Rigid Body" modifier selected, go to "General Properties" under the modifier list and input a weight in the "Mass (kg)" text field, from what I know the actual number here doesn't matter, it just needs to have a number other than zero. I use 6.66 for lols. (Remember, in the advanced method your "Rigid Body" modifier is on your visual object.) | With the "Rigid Body" modifier selected, go to "General Properties" under the modifier list and input a weight in the "Mass (kg)" text field, from what I know the actual number here doesn't matter, it just needs to have a number other than zero. I use 6.66 for lols. (Remember, in the advanced method your "Rigid Body" modifier is on your visual object.) | ||
[[File:F4_Custom_Doors_04.png| | [[File:F4_Custom_Doors_04.png|thumb|center]] | ||
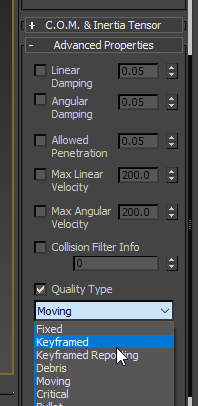
Next, with the Rigid Body modifier still selected, expand the "Advanced Properties" section further down and tick the "Quality Type" box and in the drop-down list next to it select "Keyframed". | Next, with the Rigid Body modifier still selected, expand the "Advanced Properties" section further down and tick the "Quality Type" box and in the drop-down list next to it select "Keyframed". | ||
[[File:F4_Custom_Doors_05.png| | [[File:F4_Custom_Doors_05.png|thumb|center]] | ||
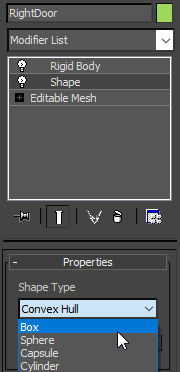
Now we need to address the "Shape" modifier that's been applied to your object or objects. The only property you need to set for this is "Shape Type", I haven't experimented with this but my guess is you'll just want to select "Box" since most doors are essentially a tall, wide, thin box shape. If you want more complex collision, choose "Mesh" here but this can take up a lot of processing power without really needing to. (The "Shape" modifier is on your collision object using the advanced method.) | Now we need to address the "Shape" modifier that's been applied to your object or objects. The only property you need to set for this is "Shape Type", I haven't experimented with this but my guess is you'll just want to select "Box" since most doors are essentially a tall, wide, thin box shape. If you want more complex collision, choose "Mesh" here but this can take up a lot of processing power without really needing to. (The "Shape" modifier is on your collision object using the advanced method.) | ||
[[File:F4_Custom_Doors_06.png| | [[File:F4_Custom_Doors_06.png|thumb|center]] | ||
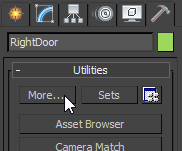
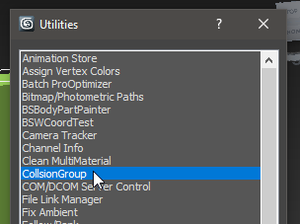
Finally to set up our collision, we need to go to the "Utilities" tab located above your modifier list to the right-hand side and under the "Utilities" heading click the "More..." text button and select "Collision Group" from the list that appears. This will display the "Collision Group" heading underneath the "Utilities" heading. Collision Group options will show up on your collision object if you're going the advanced path. | Finally to set up our collision, we need to go to the "Utilities" tab located above your modifier list to the right-hand side and under the "Utilities" heading click the "More..." text button and select "Collision Group" from the list that appears. This will display the "Collision Group" heading underneath the "Utilities" heading. Collision Group options will show up on your collision object if you're going the advanced path. | ||
[[File:F4_Custom_Doors_07.png| | [[File:F4_Custom_Doors_07.png|thumb|center]] | ||
[[File:F4_Custom_Doors_08.png| | [[File:F4_Custom_Doors_08.png|thumb|center]] | ||
In the "Default Materials" dropdown select what type of material your object is, this is entirely up to you and will affect how your object acts when shot or hit or walked on (the sound it makes, damage decals, there may be other things I'm not aware of too.) | In the "Default Materials" dropdown select what type of material your object is, this is entirely up to you and will affect how your object acts when shot or hit or walked on (the sound it makes, damage decals, there may be other things I'm not aware of too.) | ||
[[File:F4_Custom_Doors_09.png| | [[File:F4_Custom_Doors_09.png|thumb|center]] | ||
Next set the "Object Type" dropdown in the "Collision Group" properties to "Anim Static." Click the "Apply to Selected" button. | Next set the "Object Type" dropdown in the "Collision Group" properties to "Anim Static." Click the "Apply to Selected" button. | ||
[[File:F4_Custom_Doors_10.png| | [[File:F4_Custom_Doors_10.png|thumb|center]] | ||
Finally, when all your collision is set, we need to reset our Xforms. I don't know what they are or what they do but we need to reset them to make our nif happy. Simply '''select everything''' in your scene, click the "Reset Xform" text button under the "Utilities" heading (the same place the "More..." text button was earlier) and when the "Reset Transform" heading pops up below (still on the "Utilities" tab with the hammer icon) hit the "Reset Selected" text button. Now go to your modifier stack, and collapse any "XForm" modifiers that have been created by right clicking on the modifier and selecting "Collapse To." I'm not sure you have to collapse these, but it's just tidier to do so. | Finally, when all your collision is set, we need to reset our Xforms. I don't know what they are or what they do but we need to reset them to make our nif happy. Simply '''select everything''' in your scene, click the "Reset Xform" text button under the "Utilities" heading (the same place the "More..." text button was earlier) and when the "Reset Transform" heading pops up below (still on the "Utilities" tab with the hammer icon) hit the "Reset Selected" text button. Now go to your modifier stack, and collapse any "XForm" modifiers that have been created by right clicking on the modifier and selecting "Collapse To." I'm not sure you have to collapse these, but it's just tidier to do so. | ||
[[File:F4_Custom_Doors_11.png| | [[File:F4_Custom_Doors_11.png|thumb|center]] | ||
[[File:F4_Custom_Doors_12.png| | [[File:F4_Custom_Doors_12.png|thumb|center]] | ||
You've just set up collision for your door, give yourself a pat on the back and pour a glass of cherry coke (cherry coke optional). | You've just set up collision for your door, give yourself a pat on the back and pour a glass of cherry coke (cherry coke optional). | ||
| Line 107: | Line 107: | ||
Double doors need one extra step in order to work properly with both doors opening together. You'll need to create a dummy (Create > Helpers > Dummy), click and drag until it appears as a box, it doesn't matter too much what size and position it is as it won't be visible, to be tidy I keep it at the bottom of my doors in the centre, I think this is what Betheda does. Now use the "Select and Link" tool to link your doors to the dummy, '''your dummy must be the parent and not the child'''. You can check your links by going to Graph Editors > New Schematic View, the popup window will show you how all your objects are related. Don't worry about any parts like doorknobs that you have linked to your doors, or custom collision if you took the advanced route, they only need to be linked to the "main" part of your door that you've linked to the dummy. | Double doors need one extra step in order to work properly with both doors opening together. You'll need to create a dummy (Create > Helpers > Dummy), click and drag until it appears as a box, it doesn't matter too much what size and position it is as it won't be visible, to be tidy I keep it at the bottom of my doors in the centre, I think this is what Betheda does. Now use the "Select and Link" tool to link your doors to the dummy, '''your dummy must be the parent and not the child'''. You can check your links by going to Graph Editors > New Schematic View, the popup window will show you how all your objects are related. Don't worry about any parts like doorknobs that you have linked to your doors, or custom collision if you took the advanced route, they only need to be linked to the "main" part of your door that you've linked to the dummy. | ||
[[File:F4_Custom_Doors_13.png| | [[File:F4_Custom_Doors_13.png|thumb|center]] | ||
[[File:F4_Custom_Doors_14.png| | [[File:F4_Custom_Doors_14.png|thumb|center]] | ||
Now that you have your dummy set up as parent to your doors, '''all animation manager functions will be carried out on your dummy''', you needn't worry about the doors themselves. | Now that you have your dummy set up as parent to your doors, '''all animation manager functions will be carried out on your dummy''', you needn't worry about the doors themselves. | ||
| Line 117: | Line 117: | ||
Go to the "Utilities" tab in the Command Panel (the hammer icon) and under the "Utilities" heading, click the "MAXScript" text button. Don't worry, we're not going to be writing any script, the Bethesda plugins will do all the hard work! Again, this is where using 3ds Max makes life a lot easier. In the next heading down "MAXScript" there should be a dropdown menu, select "Gamebryo Animation Manager," this should drop down a whole bunch of new headings below. | Go to the "Utilities" tab in the Command Panel (the hammer icon) and under the "Utilities" heading, click the "MAXScript" text button. Don't worry, we're not going to be writing any script, the Bethesda plugins will do all the hard work! Again, this is where using 3ds Max makes life a lot easier. In the next heading down "MAXScript" there should be a dropdown menu, select "Gamebryo Animation Manager," this should drop down a whole bunch of new headings below. | ||
[[File:F4_Custom_Doors_15.png| | [[File:F4_Custom_Doors_15.png|thumb|center]] [[File:F4_Custom_Doors_16.png|thumb|center]] | ||
Below the "Actors" heading there should be a dropdown called "Known Actor Roots" with an "Add" text button beneath, click this and you're ready to add your door as an actor. Simply click on the '''main part of your door that everything else is linked to (not your collision mesh, if you made a custom one)''' and now your door is an actor ready to have animation assigned to it. | Below the "Actors" heading there should be a dropdown called "Known Actor Roots" with an "Add" text button beneath, click this and you're ready to add your door as an actor. Simply click on the '''main part of your door that everything else is linked to (not your collision mesh, if you made a custom one)''' and now your door is an actor ready to have animation assigned to it. | ||
[[File:F4_Custom_Doors_17.png| | [[File:F4_Custom_Doors_17.png|thumb|center]] | ||
Next, scroll down to the "Active Sequence" heading, in the text field labelled "Active Sequence Name" there should be something similar to "EMPTY_SEQUENCE_AT_XXX", delete this and type in "Open". Below this is a "Loop Sequence" checkbox, you should uncheck this if it isn't already. Below that are "Start Frame" and "End Frame" text fields, enter the numbers for the keyframes that start and end your animation here, typically your "Open" sequence will begin at 0. | Next, scroll down to the "Active Sequence" heading, in the text field labelled "Active Sequence Name" there should be something similar to "EMPTY_SEQUENCE_AT_XXX", delete this and type in "Open". Below this is a "Loop Sequence" checkbox, you should uncheck this if it isn't already. Below that are "Start Frame" and "End Frame" text fields, enter the numbers for the keyframes that start and end your animation here, typically your "Open" sequence will begin at 0. | ||
[[File:F4_Custom_Doors_18.png| | [[File:F4_Custom_Doors_18.png|thumb|center]] | ||
Scroll further down to the "Sequence Tags" heading and open it if it's collapsed (it usually starts as collapsed, with only the heading visible.) Move your time slider (under your viewports, at the bottom of your window) to 0 and hit the "Add Morph Tag" text button. If you get a warning, this means your slider is not between the start and end times of the sequence you just created. In the "Key Text" text field, type "Open", an underscore "_" will be added to the end of the name, don't worry about that. Check that the "Tag Time" number is the start frame of your open sequence, in this case probably 0. | Scroll further down to the "Sequence Tags" heading and open it if it's collapsed (it usually starts as collapsed, with only the heading visible.) Move your time slider (under your viewports, at the bottom of your window) to 0 and hit the "Add Morph Tag" text button. If you get a warning, this means your slider is not between the start and end times of the sequence you just created. In the "Key Text" text field, type "Open", an underscore "_" will be added to the end of the name, don't worry about that. Check that the "Tag Time" number is the start frame of your open sequence, in this case probably 0. | ||
[[File:F4_Custom_Doors_19.png| | [[File:F4_Custom_Doors_19.png|thumb|center]] | ||
That's everything set up for your "Open" sequence! | That's everything set up for your "Open" sequence! | ||
To create your "Close" sequence, go back to the "Active Sequence" heading and click the text button that says "Append New Sequence," your new sequence should start the frame after the last frame of your "Open" sequence (remember that one frame we left between? That's why.) | To create your "Close" sequence, go back to the "Active Sequence" heading and click the text button that says "Append New Sequence," your new sequence should start the frame after the last frame of your "Open" sequence (remember that one frame we left between? That's why.) | ||
[[File:F4_Custom_Doors_20.png| | [[File:F4_Custom_Doors_20.png|thumb|center]] | ||
Now repeat the steps you took for your "Open" sequence but this time you should use "Close" as the name and the start and end times should be the first and last frames of your keyframed closing animation. '''The "Loop Sequence" checkbox will definitely check itself this time, so be sure to uncheck it.''' Use the first frame of your "Close" animation for the position of your "Close" morph tag. | Now repeat the steps you took for your "Open" sequence but this time you should use "Close" as the name and the start and end times should be the first and last frames of your keyframed closing animation. '''The "Loop Sequence" checkbox will definitely check itself this time, so be sure to uncheck it.''' Use the first frame of your "Close" animation for the position of your "Close" morph tag. | ||
| Line 145: | Line 145: | ||
Select everything (except your dummy, if you've used one) and open the material editor by pressing M. Select a blank material if the first one selected isn't blank (these are the spheres you can see). Click where you see the text button that should say "Standard" and select "BSLightingFX" from the list that pops up. | Select everything (except your dummy, if you've used one) and open the material editor by pressing M. Select a blank material if the first one selected isn't blank (these are the spheres you can see). Click where you see the text button that should say "Standard" and select "BSLightingFX" from the list that pops up. | ||
[[File:F4_Custom_Doors_21.png| | [[File:F4_Custom_Doors_21.png|thumb|center]] | ||
Now drag the sphere that you just assigned BSLightingFX to onto your selected objects and a popup should appear, select "Apply to Selection", everything should go white, this is normal. We're ready to export! | Now drag the sphere that you just assigned BSLightingFX to onto your selected objects and a popup should appear, select "Apply to Selection", everything should go white, this is normal. We're ready to export! | ||
| Line 151: | Line 151: | ||
Go to File (big 3ds Max logo in the top left) > Export and when the save window pops up, select "Gamebryo..." as your file type. If you have the niftools unofficial plugin installed too, the file option "Netimmerse/Gamebryo..." will show up in the list too but don't use that option. | Go to File (big 3ds Max logo in the top left) > Export and when the save window pops up, select "Gamebryo..." as your file type. If you have the niftools unofficial plugin installed too, the file option "Netimmerse/Gamebryo..." will show up in the list too but don't use that option. | ||
[[File:F4_Custom_Doors_22.png| | [[File:F4_Custom_Doors_22.png|thumb|center]] | ||
When you're shown the export dialogue you need to select PE Anim in the "File Export Script" dropdown menu and hit Ok. If you get any errors about xforms, repeat the step to reset xforms, making sure none of your objects were missed the first time. If you've done everything right, your nif should export and be ready to be run through Elric. | When you're shown the export dialogue you need to select PE Anim in the "File Export Script" dropdown menu and hit Ok. If you get any errors about xforms, repeat the step to reset xforms, making sure none of your objects were missed the first time. If you've done everything right, your nif should export and be ready to be run through Elric. | ||
[[File:F4_Custom_Doors_23.png| | [[File:F4_Custom_Doors_23.png|thumb|center]] | ||
== Elric == | == Elric == | ||
| Line 161: | Line 161: | ||
Elric can be found in your "Tools" folder in your Fallout 4 directory. Open the app, go to File > Load Settings... in the text menu and find the "PCMeshes.esf" file in the Elric/Settings folder, click "Yes" when the dialogue box appears. | Elric can be found in your "Tools" folder in your Fallout 4 directory. Open the app, go to File > Load Settings... in the text menu and find the "PCMeshes.esf" file in the Elric/Settings folder, click "Yes" when the dialogue box appears. | ||
[[File:F4_Custom_Doors_24.png| | [[File:F4_Custom_Doors_24.png|thumb|center]] | ||
Now click the "Convert Files" text button in the lower left of the app and find and select your nif. Once you've done this, your converted and ready-to-use nif should be in the Elric/Processed folder. | Now click the "Convert Files" text button in the lower left of the app and find and select your nif. Once you've done this, your converted and ready-to-use nif should be in the Elric/Processed folder. | ||
Latest revision as of 07:51, 23 March 2017
Full credit for figuring this all out goes to DogToothCG, I'm just documenting it here so others can use it. He is a gentleman, a scholar and an incredibly gifted modder.
This tutorial will show you how to create fully-functional animated door nifs using 3ds Max 2013 (2014 will also work, as long as you've set up the Bethesda plugin properly.) We'll cover both single and double door animations.
What you'll need:
- 3ds Max 2013 / 2014
- The official Bethesda NIF exporter (included in the Creation Kit "tools" folder)
- Elric (again, in the "tools" folder)
- Nifskope
- If you're importing a nif to edit, you'll need to use the niftools unofficial import / export tool. Still use the official exporter for exporting your work though. Figment's niftools plugin
Setup[edit | edit source]
This tutorial won't show you how to create the model for your door and add keyframes to it, we're assuming you've done that already.
Your keyframed animation should all be on one timeline, the only special step you need to take is leaving one frame between the end of your “open” animation and the start of your “close” animation as when you're telling the Beth plugin where in the timeline your animations are, you cannot use one keyframe in more than one of your animation stages.
Basic Nif Settings[edit | edit source]
If you want your door to fit vanilla doorframes, it needs to be 96 units wide and 168 units tall, breadth seems to matter less, vanilla doors can vary from 4 to 8 units front-to-back.
If you've imported a vanilla nif using the niftools unofficial plugin, it will have painted all your vertices black, if you export a nif like this it'll show up black like it's been scorched in the Glowing Sea. You'll need to add a vertex paint modifier to all your objects, select white as your colour (on the vertex paint toolbar) and paint them all using the "Paint All" button. You can then collapse this modifier on all objects.
Again, if you've imported a vanilla nif then you'll need to remove all Havok data from it before proceeding, you can do this with the "Remove Havok Data" button on the Havok toolbar or from the text menu (Havok Contents Tools > Remove Havok Data.) You can also show the Havok toolbar from here, if it's hidden ("Show Toolbars" option.)
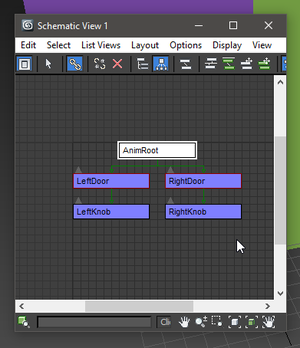
Your doors can be made of multiple objects, just make sure they're all linked to one central "Parent" object, best to use the biggest part of your door for this role. To do this, select the "Select and Link" button on your main toolbar, select the object you want to link to the main part of your door (for example, your doorknob, this is going to be a "Child") then click and drag to the main part of your door (this will be the "Parent"). When you release your click, you should see your "Parent" object briefly be selected, this is showing you it has worked. To keep track of your links you can go to Graph Editors > New Schematic View in the text menu, this will pop up a window which shows you how your objects are linked.
You can also make double doors, just follow every process normally making sure you give both doors collision individually. There will be some extra steps you need to take when we get to the animation manager phase. Both doors still need individual keyframed animation.
Collision[edit | edit source]
Note that you can have objects in your nif which don't animate, as well as the animated "opening" part, I won't cover how to set these up here other than to say you use the same collision-creation process I'll take you through below but you don't need to set the "Quality type > Keyframed" option and your "Object Type" will be "Static" rather than "Anim Static."
There are 2 methods for creating collision, both of them supported on animations. The first method is more simple but may give you less accurate collision, the second takes more work but can give more customised results. You can use different methods for different objects within your door.
Remember: collision takes a lot of processing power, the simpler the collision, the better.
Advanced Method (Custom Collision Objects)[edit | edit source]
Ignore this step if you're happy with simple collision and continue to the "Simple Method" section.
To make a custom collision mesh, you need to manually create the objects you want to represent the physical "presence" of your object or objects. You can either make these from scratch or clone parts of your existing object(s). If your collision object is going to be exactly the same as your visual object you don't need to use this method, just use "Mesh" as your "Shape Type" property for the "Shape" modifier. Just remember that when it comes to collision the simpler it is, the better.
Make sure if you have any shapes that aren't an "Editable Mesh", that you convert them to an editable mesh before you go any further.
Once you have your custom collision object or objects made, you need to carry out the following steps for each pair of visual (your original model) and collision objects one at a time, don't just select all objects at once. So if you have a separate doorknob for instance, you'll need to pair that up with its collision separately to pairing up the body of the door with its own collision.
Select your pair of objects (the visual mesh of the object and the custom collision object you've made) and go to Havok Contents Tools > Physics > Create Rigid Body With Proxy(s), it's very important that when 3ds pops up the dialogue box it's showing the name of your visual object, otherwise the roles of your visual mesh and collision will be reversed. If the name of your collision object pops up, click "No." It can take a few tries de-selecting and re-selecting before you get the right mesh to show up in the dialogue, try different orders of selection. If it shows the name of your visual mesh, click "Yes" and we'll move on to the next stage.
From here on out, you'll follow the simple method but your "Rigid Body" modifier will be on your visual object and your "Shape" modifier will be on your collision object. Selecting your collision object should allow you to edit "Collison Group" properties, we'll get to that further down.
Simple Method[edit | edit source]
You'll need to carry out these steps individually for each object on your door, for instance, a separate door knob that isn't the same object as the main body of your door.
Select the object you want to have collision, and go to Havok Contents Tools > Physics > Create Rigid Body. You'll notice 2 modifiers have appeared on the object you had selected. (Skip this step if you're using the advanced method, you'll have already created your "Rigid Body With Proxy(s).")
With the "Rigid Body" modifier selected, go to "General Properties" under the modifier list and input a weight in the "Mass (kg)" text field, from what I know the actual number here doesn't matter, it just needs to have a number other than zero. I use 6.66 for lols. (Remember, in the advanced method your "Rigid Body" modifier is on your visual object.)
Next, with the Rigid Body modifier still selected, expand the "Advanced Properties" section further down and tick the "Quality Type" box and in the drop-down list next to it select "Keyframed".
Now we need to address the "Shape" modifier that's been applied to your object or objects. The only property you need to set for this is "Shape Type", I haven't experimented with this but my guess is you'll just want to select "Box" since most doors are essentially a tall, wide, thin box shape. If you want more complex collision, choose "Mesh" here but this can take up a lot of processing power without really needing to. (The "Shape" modifier is on your collision object using the advanced method.)
Finally to set up our collision, we need to go to the "Utilities" tab located above your modifier list to the right-hand side and under the "Utilities" heading click the "More..." text button and select "Collision Group" from the list that appears. This will display the "Collision Group" heading underneath the "Utilities" heading. Collision Group options will show up on your collision object if you're going the advanced path.
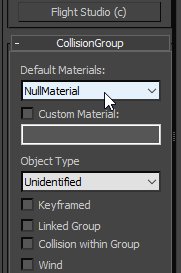
In the "Default Materials" dropdown select what type of material your object is, this is entirely up to you and will affect how your object acts when shot or hit or walked on (the sound it makes, damage decals, there may be other things I'm not aware of too.)
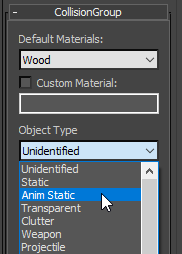
Next set the "Object Type" dropdown in the "Collision Group" properties to "Anim Static." Click the "Apply to Selected" button.
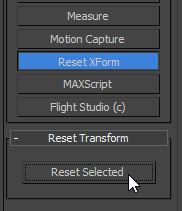
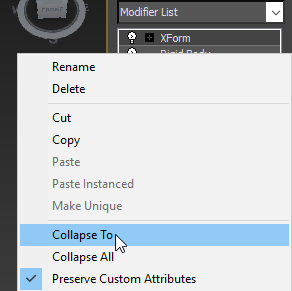
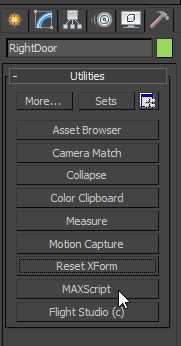
Finally, when all your collision is set, we need to reset our Xforms. I don't know what they are or what they do but we need to reset them to make our nif happy. Simply select everything in your scene, click the "Reset Xform" text button under the "Utilities" heading (the same place the "More..." text button was earlier) and when the "Reset Transform" heading pops up below (still on the "Utilities" tab with the hammer icon) hit the "Reset Selected" text button. Now go to your modifier stack, and collapse any "XForm" modifiers that have been created by right clicking on the modifier and selecting "Collapse To." I'm not sure you have to collapse these, but it's just tidier to do so.
You've just set up collision for your door, give yourself a pat on the back and pour a glass of cherry coke (cherry coke optional).
Animation Manager[edit | edit source]
At this point you should have your objects, keyframes (don't forget the 1 frame gap between opening and closing animations!) and collision set up, from here on we're setting the information that tells the nif (which tells the game) where your animations are and what they do. It might sound complicated or intimidating but it’s pretty straightforward and this is where using 3ds Max to make an animated nif really pays off.
Double Doors[edit | edit source]
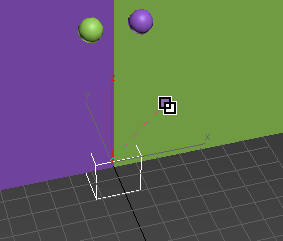
If you only have a single door, ignore this section. Double doors need one extra step in order to work properly with both doors opening together. You'll need to create a dummy (Create > Helpers > Dummy), click and drag until it appears as a box, it doesn't matter too much what size and position it is as it won't be visible, to be tidy I keep it at the bottom of my doors in the centre, I think this is what Betheda does. Now use the "Select and Link" tool to link your doors to the dummy, your dummy must be the parent and not the child. You can check your links by going to Graph Editors > New Schematic View, the popup window will show you how all your objects are related. Don't worry about any parts like doorknobs that you have linked to your doors, or custom collision if you took the advanced route, they only need to be linked to the "main" part of your door that you've linked to the dummy.
Now that you have your dummy set up as parent to your doors, all animation manager functions will be carried out on your dummy, you needn't worry about the doors themselves.
Setting Animation Sequences and Morph Tags[edit | edit source]
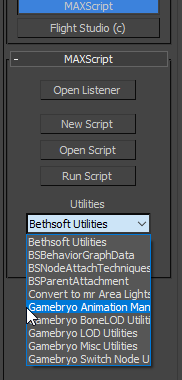
Go to the "Utilities" tab in the Command Panel (the hammer icon) and under the "Utilities" heading, click the "MAXScript" text button. Don't worry, we're not going to be writing any script, the Bethesda plugins will do all the hard work! Again, this is where using 3ds Max makes life a lot easier. In the next heading down "MAXScript" there should be a dropdown menu, select "Gamebryo Animation Manager," this should drop down a whole bunch of new headings below.
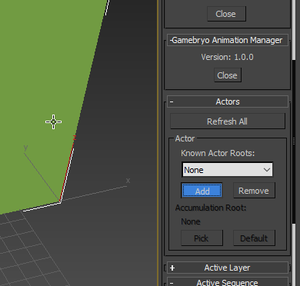
Below the "Actors" heading there should be a dropdown called "Known Actor Roots" with an "Add" text button beneath, click this and you're ready to add your door as an actor. Simply click on the main part of your door that everything else is linked to (not your collision mesh, if you made a custom one) and now your door is an actor ready to have animation assigned to it.
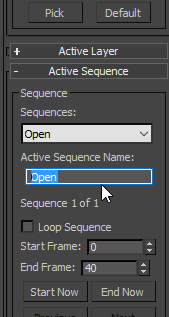
Next, scroll down to the "Active Sequence" heading, in the text field labelled "Active Sequence Name" there should be something similar to "EMPTY_SEQUENCE_AT_XXX", delete this and type in "Open". Below this is a "Loop Sequence" checkbox, you should uncheck this if it isn't already. Below that are "Start Frame" and "End Frame" text fields, enter the numbers for the keyframes that start and end your animation here, typically your "Open" sequence will begin at 0.
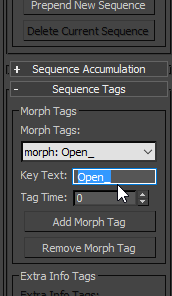
Scroll further down to the "Sequence Tags" heading and open it if it's collapsed (it usually starts as collapsed, with only the heading visible.) Move your time slider (under your viewports, at the bottom of your window) to 0 and hit the "Add Morph Tag" text button. If you get a warning, this means your slider is not between the start and end times of the sequence you just created. In the "Key Text" text field, type "Open", an underscore "_" will be added to the end of the name, don't worry about that. Check that the "Tag Time" number is the start frame of your open sequence, in this case probably 0.
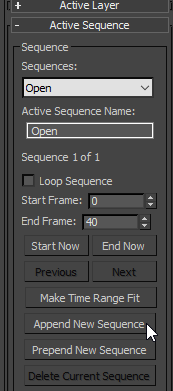
That's everything set up for your "Open" sequence! To create your "Close" sequence, go back to the "Active Sequence" heading and click the text button that says "Append New Sequence," your new sequence should start the frame after the last frame of your "Open" sequence (remember that one frame we left between? That's why.)
Now repeat the steps you took for your "Open" sequence but this time you should use "Close" as the name and the start and end times should be the first and last frames of your keyframed closing animation. The "Loop Sequence" checkbox will definitely check itself this time, so be sure to uncheck it. Use the first frame of your "Close" animation for the position of your "Close" morph tag.
You’re done with setting up your animations! Give yourself a high five and take some deep breaths.
Set BSLightingFX and Export[edit | edit source]
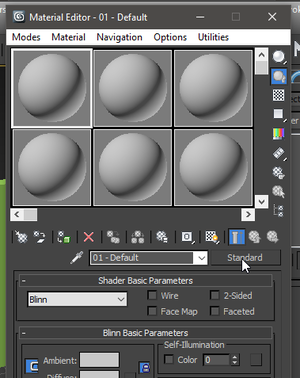
Before you can export, you'll need to set all your materials to BSLightingFX, anything that doesn't use this type of material will not export. You might want to save a copy of your model as a 3ds Max file before you do this, then you can refer back to your model materials to set them back to the correct paths after you’ve exported. Select everything (except your dummy, if you've used one) and open the material editor by pressing M. Select a blank material if the first one selected isn't blank (these are the spheres you can see). Click where you see the text button that should say "Standard" and select "BSLightingFX" from the list that pops up.
Now drag the sphere that you just assigned BSLightingFX to onto your selected objects and a popup should appear, select "Apply to Selection", everything should go white, this is normal. We're ready to export!
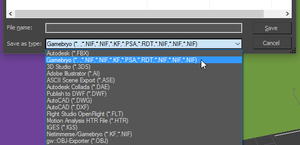
Go to File (big 3ds Max logo in the top left) > Export and when the save window pops up, select "Gamebryo..." as your file type. If you have the niftools unofficial plugin installed too, the file option "Netimmerse/Gamebryo..." will show up in the list too but don't use that option.
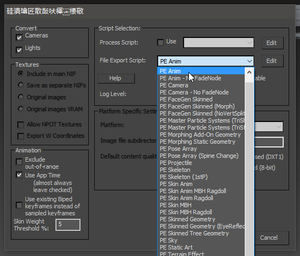
When you're shown the export dialogue you need to select PE Anim in the "File Export Script" dropdown menu and hit Ok. If you get any errors about xforms, repeat the step to reset xforms, making sure none of your objects were missed the first time. If you've done everything right, your nif should export and be ready to be run through Elric.
Elric[edit | edit source]
Elric can be found in your "Tools" folder in your Fallout 4 directory. Open the app, go to File > Load Settings... in the text menu and find the "PCMeshes.esf" file in the Elric/Settings folder, click "Yes" when the dialogue box appears.
Now click the "Convert Files" text button in the lower left of the app and find and select your nif. Once you've done this, your converted and ready-to-use nif should be in the Elric/Processed folder.
Don't forget to load your nif into nifskope and set all your materials back to the correct paths.
And that's it, you're done!
I hope this tutorial tells you everything you need to know, enjoy your beautiful new doors! - Casputin x
