Difference between revisions of "Version Control"
imported>HaploTR |
imported>HaploTR |
||
| Line 172: | Line 172: | ||
<br/> | <br/> | ||
== Merge process and workflow of the individual team member == | == Merge process and workflow of the individual team member == | ||
<br/> | |||
* Download the latest .esm file from the repository, to both the \Fallout 4\Data\ folder, AND \Merging\Data\. | * Download the latest .esm file from the repository, to both the \Fallout 4\Data\ folder, AND \Merging\Data\. | ||
* Open the Creation Kit, and begin making your changes to the .esp file. | * Open the Creation Kit, and begin making your changes to the .esp file. | ||
| Line 188: | Line 189: | ||
* You'll now be shown a new popup titled "File Details", but it will have no contents. | * You'll now be shown a new popup titled "File Details", but it will have no contents. | ||
** On your keyboard, press Shift+Ctrl+B | ** On your keyboard, press Shift+Ctrl+B | ||
* You'll be asked if you want to update the Bit Array Files, and warned it can take several minutes. | * You'll be asked if you want to update the Bit Array Files, and warned it can take several minutes. Click "Yes". | ||
*: [[File:versioncontrol_update_bit_array_file.png]] | *: [[File:versioncontrol_update_bit_array_file.png]] | ||
* When it's finished, you'll see "Updating bit arrays...Done" in the bottom status bar of the main window | * When it's finished, you'll see "Updating bit arrays...Done" in the bottom status bar of the main window | ||
*: [[File:versioncontrol_update_bit_array_done.png]] | *: [[File:versioncontrol_update_bit_array_done.png]] | ||
<br/> | |||
* With the bit array updated, you're ready to merge! | |||
* Cancel out of the Data window, you don't need to re-open the .esp, because you already opened it. | |||
* Now click the Version Control button | |||
*: [[File:versioncontrol_button.png]] | |||
* Select all the entries in the list, and click "Check Out" | |||
* Select all the entries again, and click "Check In" | |||
*: [[File:versioncontrol_changedreferences.png]] | |||
* Once you regain control of the window, your merge is complete! | |||
* Upload that masterpiece .esm file back to the repository. | |||
<br/> | <br/> | ||
Good luck! | Good luck! | ||
<br/> | <br/> | ||
<br/> | <br/> | ||
Revision as of 21:52, 15 November 2016
Information contained herein was taken from the Skyrim page, and amended after testing in the Fallout 4 Creation Kit. Though instructions are similar, this page shall document the process specifically for Fallout 4, in the context of mod collaboration from multiple contributors. This page will not document how to use external revision control software such as Perforce, or Git.
Setup your Creation Kit installation to enable version control
- Navigate to your Fallout 4 directory
- Create the following new folders:
- Fallout 4\Merging\Data
- Fallout 4\Merging\VersionBackup
- Fallout 4\Data\CheckInBackup
- Enable Windows Sharing for the newly created folders
- Right click on the CheckInBackup folder -> select "Properties" -> select the "Sharing" tab -> click "Advanced Sharing..."
- Click "Share this folder", and then "OK"
- Back on the Properties windows, click "Share..."
- You won't actually be sharing your computer with anyone else, so you don't have to add any additional users - just click "Share" -> "Done"
- Make note of the "Network Path" displayed, you'll need this for the next step
- Repeat the above for the Merging folder (you don't need to do this individually for the two sub-folders within)

- Next, navigate back to your Fallout 4 directory
- Open the file "CreationKit.ini"
- Modify the following line to say:
bUseVersionControl=1
- Add the following lines (anywhere under the "[General]" heading):
SNetwork Path=\\COMP-NAME\Merging\
SNewVersionBackupPath=\\COMP-NAME\Merging\VersionBackup\
SNetworkMasterPath=\\COMP-NAME\Merging\Data\
SLocalBackupPath=Data\CheckInBackup\
- Note:
- - There is a space in "SNetwork Path"
- - Replace "COMP-NAME" with your computer name, displayed on the window in the above screenshot
- - Do not omit the "\" at the end of the paths above, or this will not work properly


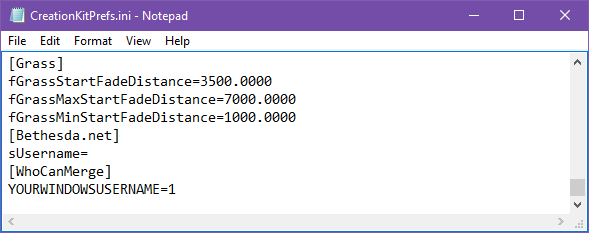
- Finally, open "CreationKitPrefs.ini"
- Scroll to the bottom of the file, and add the following lines
[WhoCanMerge]
YOURWINDOWSUSERNAME=1
- Note:
- - Replace "YOURWINDOWSUSERNAME" with your actual windows username

Understanding .esp and .esm files
.esp files are "Bethesda Plugin Data Files"
- This is the standard file type created by the Creation Kit, to save your mod
- It contains all of the asset reference data used in your mod
.esm files are "Bethesda Master Data Files"
- This is the file type you'll see used by DLC
- It contains the same information used by .esp files, but it can have references merged into it
In the context of using version control in the Fallout 4 Creation Kit:
- The .esm master file will be your primary mod file, containing all the level and asset reference data for your mod. When you're ready to distribute your mod, it's the .esm that you'll upload.
- The .esp file will be the file you and your project contributors use locally to make all your changes. After you merge your changes into the .esm file, the .esp won't contain any references
- The first time you save your mod, it will be saved as .esp (you do not have a choice)
- It will become .esm the first time you do a merge to prepare it for multi-contributor collaboration
First merge and creation of your .esm file
Once you've saved your mod as a .esp (regardless of the content), you must do a first merge to create your initial .esm file:
- Navigate to your "Fallout 4\Data" directory
- Copy "Fallout4.esm" to "Fallout 4\Merging\Data"
- If you don't copy this file, the merge process will error out
- Next, open your .esp as the Active File
- After the file has finished loading in the Creation Kit, click "File" -> "Data..." (or the open folder icon)
- Select "Fallout4.esm" in the list, and click "Details..."
- When asked "Do you want to use an empty list to save memory?", click "Yes"
- You'll now be shown a new popup titled "File Details", but it will have no contents.
- On your keyboard, press Shift+Ctrl+B
- You'll be asked if you want to update the Bit Array Files, and warned it can take several minutes. Of course, click "Yes".
- When it's finished, you'll see "Updating bit arrays...Done" in the bottom status bar of the main window


Now you're ready to create your .esm file!
- Ensure the .esp mod file has been opened as the Active File (this should have been done earlier, but do it again if you restarted the Creation Kit)
- You'll notice that you have a new little Version Control icon from when we enabled it in the Creation Kit. Click it.
- For this tutorial, I created "MyMod.esp", and I duplicated the "aaaMarkers" Cell from the base game Fallout4.esm
- In the bottom left, the "Altered" View will show all of the changes detected between the Fallout4.esm file, and MyMod.esp
- Select all the files in the list, and click "Check Out". This will deselect them.
- Select all the files in the list, and click "Check In". This will open a comment box. You can ignore this for the first time .esm creation, and just click "OK".
- Next it will open a save dialogue, defaulting to \\COMP-NAME\Merging\Data
- Save your plugin using any name (presumably the same name as your .esp, but notice the file extension is .esm in the save dialogue)
- Do NOT attempt to overwrite Fallout4.esm
- When asked "Do you wish to select a Check In Data file to use for assign forms new IDs on check in?", select "No"
- The results are output into the normal Data folder
- You can see that after a merge is performed, the filesize of the .esp is now 1KB, because the contents have been transferred to the newly created .esm


Workflow for multiple team members contributing to the same .ESM file
As mentioned at the top of the page, this document will not explain how to use external revision control software such as Perforce or Git, but now we will discuss the workflow for multiple team members contributing to the same project while using such software.
Think of the .esm as the one true source for what your mod is. When you want to make changes to it, you make those changes through the .esp file. The .esp file is essentially a changelist for your local edits.
Let's say a room already exists in your .esm master file:
- When you modify a single wall in that room and save, only the modifications for that wall get saved to the .esp -- the rest of the room is not in the .esp, because it remains unchanged in the .esm file.
- When you merge the .esp into the .esm, the Creation links the IDs of those changed assets, to the assets in the .esm that share the same IDs.
- When you add things to the .esp that don't exist in the .esm, the Creation Kit knows those are new because no assets in the .esm share the same ID. So in the merge, those new asset references are added to the .esm.
- After you merge your changes into the .esm, the .esp is emptied out - there are no more changes left in your .esp, because they are now an integrated part of your .esm as the one true source.
There are a few things to remember with multiple team members working on the same master file.
- When you initiate a merge, make sure the latest .esm file from the repository is in the Merging\Data folder, not the regular folder.
- Merges into the .esm by different people must be done one a time.
- If two people were to make local edits to the mod, and then merge into their local .esm at the same time, work will be lost when both people go and upload the latest master file to the repository.
- Revision control software usually has their own tools to merge files like this together, but depending on what the changes are (especially changes to new custom content) that can be difficult, and is sometimes just not possible when two people's changes collide.
- Luckily the backup directories we created way at the top of this page are used by the Creation Kit to backup your .esp file. If a team member was to merge into a local .esm out of turn, their .esp is still in tact in the backup folder, and they can step back in line to merge in the proper queue.
- Even when properly merging changes one after another - using the last person's updated .esm to initiate your next merge - it's important that team members aren't working on the same assets, thus simply overriding the previous person's change.
- As an example:
- Let's say that two people decided to move already existing architecture assets in Layer_7
- User one moves a room down because they want to add an elevator, and they save these changes to their .esp
- User two moves the room backwards because they want to add a hallway that leads to the room, and they save these changes to their .esp
- User one correctly communicates his intent to merge into the .esm
- User one downloads the latest version of the .esm from the online repository, and initiates the merge process in the Creation Kit
- User one uploads the new .esm to the online repository
- User two correctly waits for user one to finish
- User two downloads the latest .esm that user one just finished uploading, and initiates the merge process in the Creation Kit
- User two uploads the new .esm to the online repository
- Uh oh! User two, though following the correct queue for merging changes, just blew away user one's changes. It's as if the room was never moved down, but the new elevator to nowhere probably looks great.
- As an example:
This may seem like an obvious example of where merging can go wrong, but there are many different types of content, assets, scripts, etc... that may be less obvious. Always keep this in mind, and promote frequent communication on your team.
Here's a diagram demonstrating the proper workflow for multiple team members contributing to the same mod.

- User 1 downloads version 1 of the master file
- User 1 modifies Layer 1
- User 2 also downloads version 1 of the master file
- User 2 modifies Layer 2
- This is okay, because User 1 and User 2 have communicated and understand the scope and direction of each other's changes. They know what sections of the level the other is modifying, and their changes will not collide.
- User 1 merges his modifications of Layer 1 into the .esm file
- User 1 uploads version 2 of the .esm to the repository
- User 2 waits for User 1 to finish his merge.
- User 2 downloads version 2 of the master file, to ensure it retains all the changes that User 1 just made
- User 2 merges his modification of Layer 2 into the new .esm file
- User 2 uploads version 3 of the .esm to the repository
- User 3 is also in communication with the other users, and he also needs to modify Layer 1
- User 3 must wait until User 1 is finished before he starts modifying Layer 1, or their changes will collide
- User 3 downloads version 3 of the master file
- User 3 modifies Layer 1, which contains the modifications User 1 already made
- User 3 merges his modifications of Layer 1 into the .esm file
- User 3 uploads version 4 of the .esm to the repository
Merge process and workflow of the individual team member
- Download the latest .esm file from the repository, to both the \Fallout 4\Data\ folder, AND \Merging\Data\.
- Open the Creation Kit, and begin making your changes to the .esp file.
- When you're finished your changes to the .esp, save, and close down the Creation Kit.
- Download the latest .esm file from the repository, to the \Merging\Data\ folder.
- This is ESSENTIAL in the process. Always ensure you merge into the latest version.
- The merge is not done from \Fallout 4\Data\, so ensure this is your final step before initiating your merge.
- With the latest version of the .esm in \Merging\Data\, re-open the Creation Kit.
- Open the .esp as the Active File
- Do not try to skip opening the file, the merge won't work without opening it first
- Once the file is finished opening, click "File" -> "Data..."
- Click on your mod .esm file, and then "Details".
- When asked "Do you want to use an empty list to save memory?", click "Yes"
- You'll now be shown a new popup titled "File Details", but it will have no contents.
- On your keyboard, press Shift+Ctrl+B
- You'll be asked if you want to update the Bit Array Files, and warned it can take several minutes. Click "Yes".
- When it's finished, you'll see "Updating bit arrays...Done" in the bottom status bar of the main window

- With the bit array updated, you're ready to merge!
- Cancel out of the Data window, you don't need to re-open the .esp, because you already opened it.
- Now click the Version Control button
- Select all the entries in the list, and click "Check Out"
- Select all the entries again, and click "Check In"
- Once you regain control of the window, your merge is complete!
- Upload that masterpiece .esm file back to the repository.
Good luck!