Difference between revisions of "New Editor Features"
imported>Darklocq |
imported>Darklocq m |
||
| (One intermediate revision by the same user not shown) | |||
| Line 1: | Line 1: | ||
This page goes over most of the new features introduced to the Creation Kit since the release of Skyrim. | This page goes over most of the new features introduced to the Creation Kit since the release of Skyrim. If you discover any more make sure to add them here. Also feel free to spruce this up as it was added to bit-by-bit over the course of a few years. | ||
<br> | <br> | ||
| Line 156: | Line 156: | ||
<br> | <br> | ||
== | ==Hold Alt while moving a ref to force it to snap to collision, and align to the normal of the mesh.== | ||
*Also, '''holding Alt while placing a reference''' from the Object Window will align it to the normal | *Also, '''holding Alt while placing a reference''' from the Object Window will align it to the normal | ||
Latest revision as of 14:49, 13 April 2016
This page goes over most of the new features introduced to the Creation Kit since the release of Skyrim. If you discover any more make sure to add them here. Also feel free to spruce this up as it was added to bit-by-bit over the course of a few years.
Render Window Workflow[edit | edit source]
Align Tools, or: Match Rotation/Position[edit | edit source]
You can now set the rotation or position of an object to match any other reference in the Render Window. Note that this works with multiple selections, too. Use one of the shortcuts below with any object(s) selected. A crosshair cursor will appear. Click on the desired object to align.
- Ctrl+Shift+A Aligns position.
- Ctrl+A Aligns rotation
Clear Current Snap Reference[edit | edit source]
Alt-Q will clear your current snap reference.
- You no longer have to snap to the void to clear the snap reference.
Drag De-Select References[edit | edit source]
Ctrl-Shift-Drag Select will de-select selected reference.
"Recent Cells" worldspace[edit | edit source]
- It’s located between “Interiors” and “Commonwealth” in the “World Space” drop-down in the “Cell View” window.
- Tip: for quick selecting worldspaces just click the drop-down once and hit “Space” for Interiors, “Space+R” for Recent Cells, and “C” for Commonwealth.
Filter what shows up in the Cell Objects list[edit | edit source]
- “Filtered Only” checkbox
- Only shows objects that pass the filter (Basically does what putting a SPACE in the filter would do before, keeping the list from updating all the time and slowing down workflow)
- “Visible Only” checkbox
- Only lists objects that are visible (as long as they aren’t hidden by the “1” key or by layer)
- “Selected Only” checkbox
- Only lists objects that are currently selected.
Toggle Render Window FOV[edit | edit source]
Alt-F will toggle your FOV to/from that of the game.
Ultra Slow Move/Rotate Mode[edit | edit source]
Mouse4, while held, will make movements/rotations very slow.
Move on World Axis, but Rotate on Local Axis[edit | edit source]
Alt-G will enable Local Rotation mode (Which shows as LOCALROT int he status bar.
- This will allow you to move on the world's axis, but rotate on the local axis. Hitting Alt-G again, or G (Global/Local toggle), will take you back to the WORLD/global mode.
Splines[edit | edit source]
- Place two SplineEndpointMarker objects
- With both selected, hit "P"
- Choose the base spline you'd like from the list that appears.
- The newly-created spline should be selected automatically.
- S+Mouse to scale spline thickness.
- Ctrl+Alt+S to adjust the tension
Properties Panel[edit | edit source]
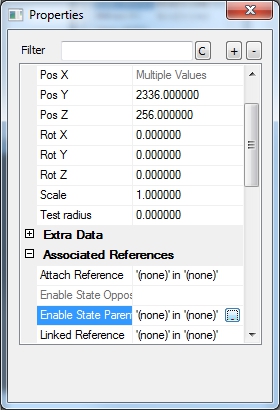
Right now it only shows data for References. The plan is that it will eventually be able to show data for forms as well.
- "Enter" key, while render window is in focus, will open the window, and put focus on the filter text box so you can easily find the data you're looking for.
- If the Properties Panel is already open it will bring it into focus and highlight the filter text box as well, again for easy data searching.
- Data in this window gets updated in real time. So the window can be kept open at all times if you'd like.
- Supports setting data on multiple selected references.
- Still Missing! (but planned)
- Setting Keyworded Linked Refs (can create a single, non-keyworded, linked ref.
- Activate Parenting
- Giving a reference a name.
Show Snap Ref Status on Status Bar[edit | edit source]
Status bar will now indicate whether or not you currently have a snap reference.
Layers[edit | edit source]
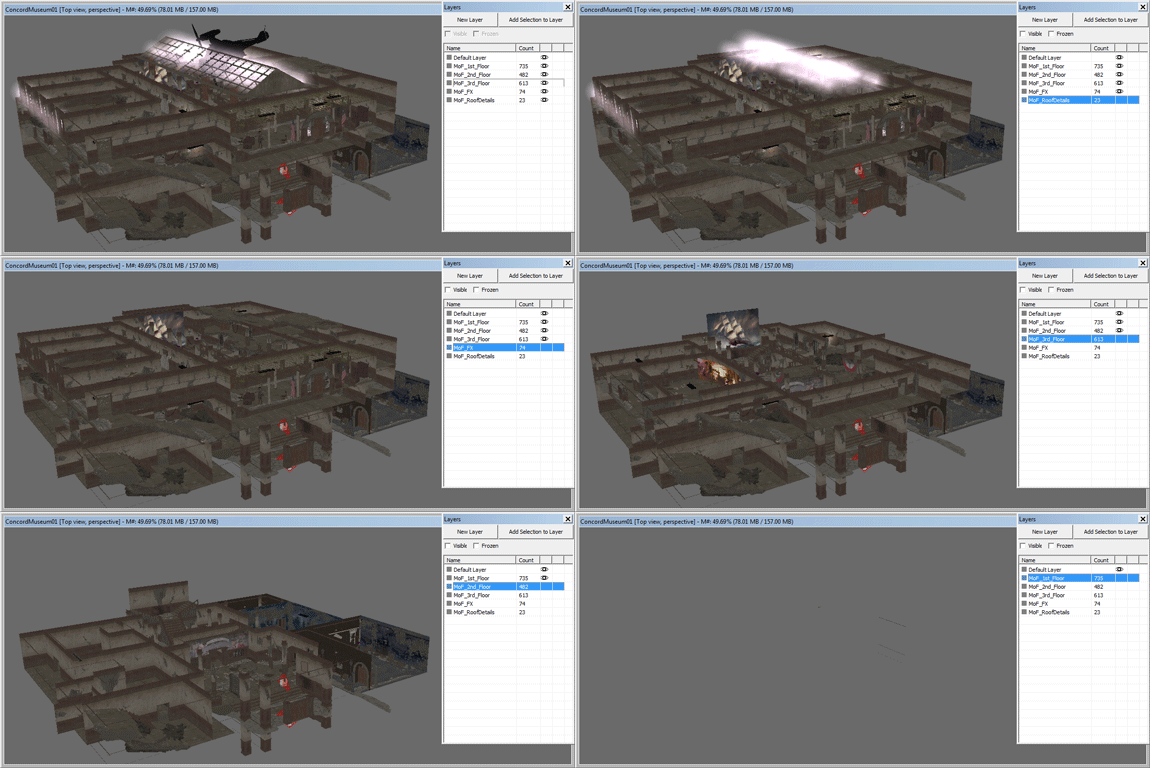
The Creation Kit now has layers!
- Layers can be Hidden or Shown by Double-Clicking the layer name.
- Layers can also be Frozen by holding Alt and Double-Clicking the layer name.
- Layers can be made Active by holding Ctrl and Double-Clicking the layer name.
- All newly created references in the scene will be placed in the currently Active Layer (Default Layer is Active by default).
Layers are unique objects, not tied to a specific cell/area. As such, they must have unique names. The Layers dialog will populate with any layers used by a reference in your loaded area. Note that the layer an object is tied to is data on that object, not the layer. This means that many people can add/remove objects from a layer without having version control issues.
The Default Layer is persistent across the game. It's essentially the "not in a layer" layer. IF you want to remove something from a layer, simply add it to this layer.
Local Rotation w/Multiple Objects[edit | edit source]
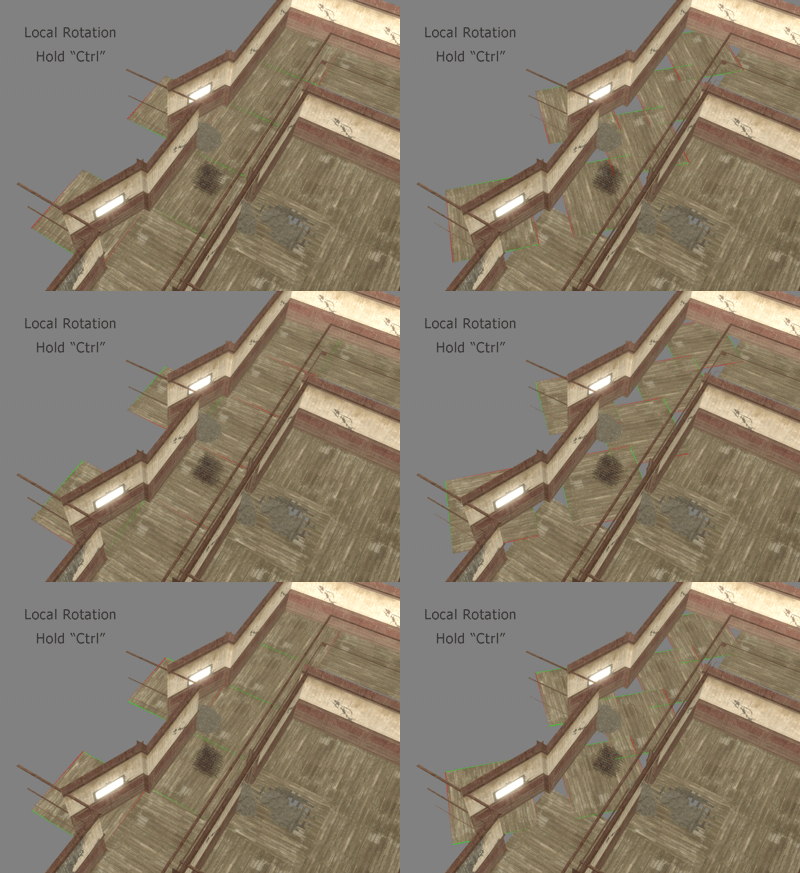
It is now possible to rotate a group of objects around their own local axes, rather than a shared axis.
- Make sure you're in Local Mode (Local Gizmo Orientation button is pressed) then just hold Ctrl and Rotate the References with the Right Mouse Button.
Wildcard Find/Replace[edit | edit source]
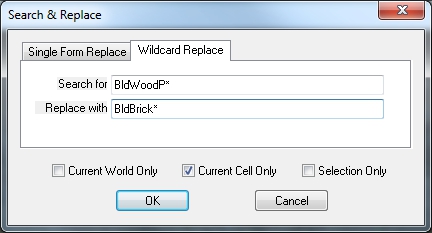
Found on a new tab in the old Find/Replace window "Ctrl-F", the Wildcard Find/Replace feature allows you to replace all selected refs, refs in cell, or refs in entire game, with a set of other forms in the editor that match the same naming convention, and wildcard position.
- EXAMPLE: In this picture these setting will replace all of the BldWoodP kit pieces in the cell with the BldBrick pieces. MUCH easier than the old method of going piece by piece and Find/Replacing each reference.
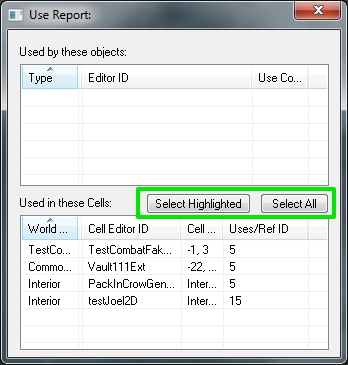
Select All Refs in Use Info Window[edit | edit source]
You can now select all the references that show up in a Use Info window. Using the new Properties Panel you can make change to all refs that you select. This keeps you from having to go to each cell in order to make changes to each reference.
Select all Links to/From Selected Reference[edit | edit source]
Right-Clicking in the render window with a reference selected will give you the option to select all the linked refs to/from the selected reference. (Useful for selecting all points in a linked ref patrol, for example).
Duplicate a Ref and LinkRef the Old One to it[edit | edit source]
Ctrl-Alt-D Duplicates a reference and LinkRef's the old reference to the newly created one.
Hold Z,X, or C will now allow you to move a reference, even if your cursor isn't over it.[edit | edit source]
Exactly as described in the headline, :)
Hold Alt while moving a ref to force it to snap to collision, and align to the normal of the mesh.[edit | edit source]
- Also, holding Alt while placing a reference from the Object Window will align it to the normal
- Alt-N will pop the selected reference to the collision under your cursor, and align it to the normal
- You can remove the "align to normal" functionality from this feature if you'd like by unchecking "Match slope when dragging" checkbox in Render Window Preferences, under the Movement tab.
Static Collections[edit | edit source]
You can group Static Objects together into one Static Collection. Each Static Collection is a form in the editor and can be placed/used in the same way as a Static Object.
- To Create a Static Collection select the Static Objects you want to be part of the collection and use Alt-O
- A name prompt will come up where you can name the new Static Collection, which will show up as a form in the Object Window.
- If you open the Static Object you will get a window where you can set the Filter String, which helps organize Static Collections into usable groups.
- For example, "Interiors\Building\WoodP\Big_Hall\" will filter this Static Collection to this specific path under the Static category in the Object Window.
- To Break a Static Collection into it's original pieces use Alt-U
- This will only break this specific Static Collection reference into it's different Static Objects. The original Static Reference is still in the editor and can be placed again.
Reference Groups[edit | edit source]
You can now gather references into selection groups. This can be handy for shelves of references you want to generally be able to move all at once, or a any references in a specific orientation that you plan on moving as one unit most of the time.
- To Create a Group use Ctrl-G
- A name prompt will come up. If you don't put a name in it will default to "Group". (The name doesn't have to be unique, name it whatever you want, or don't name it at all)
- Use this same key to add a reference to a group (with both the reference, and the group of references, selected).
- The last selected ref, when creating the group, will become the groups pivot. So rotating the group, in local mode, will rotate around the groups pivot reference.
- To break a group apart select it and hit Ctrl-U. Now all the reference are separate.
- To select a single reference that is in a group use Alt-Click. You can break this single reference out by using Ctrl-U.
- You can select multiple specific references in a group by Ctrl-Alt-Clicking each one of them.
Rotate Dead Actors on their X/Y axis'[edit | edit source]
- You previously could only rotate actors on their Z. Now it's possible to rotate an actor, if dead, on it's X and Y axis also. This makes posing dead bodies slightly easier.
Hotkey for Quickly Finding/Replacing to the Next Form[edit | edit source]
- Alt-MouseScrollUp Will quickly replace the current reference with the next form in the list.
- Alt-MouseScrollDown Will quickly replace the current reference with the previous form in the list.
[edit | edit source]
- You can now select a vert on either side of a cell boundary and weld them together. This will cause the verts to "weld" to each other at their respective cell borders.
Quick Linked Refs[edit | edit source]
Ctrl-Space allows you to quickly set a Linked Ref for the currently selected reference.
- Select your Ref
- Press Ctrl-Space
- Click the Ref you want to link to
- Hit Enter (Or type in your keyword and hit enter)
This really just brings up the batch window with a reference already selected (the one you clicked). You can perform any action from the batch window. And when you hit "Do" it will close the window.
Set Up Default Lights[edit | edit source]
If your blocking out your cell, or just making a quick test cell, then there's no need to worry about lighting, other than that you don't want it pitch black. Simply click this ![]() Set Up Default Lights button and 4 lights will be created for you at each edge of your cell with the correct scale in order to illuminate the whole cell. If you click the button again (lets say you've blocked out more of your level), and you haven't deleted any of the lights, it will move the lights instead of creating a whole new set of them.
Set Up Default Lights button and 4 lights will be created for you at each edge of your cell with the correct scale in order to illuminate the whole cell. If you click the button again (lets say you've blocked out more of your level), and you haven't deleted any of the lights, it will move the lights instead of creating a whole new set of them.
Selection Growing[edit | edit source]
It's now possible to use a special selection mode which attempts to intelligently find objects snapped to your currently selection. The detection algorithm is relatively simple, and may not be relied upon as a fool-proof way to select snapped pieces. We suspect it will be most useful for quickly selecting smaller sets of snapped objects, such as a section of pipe kit.
- ctrl+enter Grows the selection one iteration out from all currently selected objects. Note that the calculation is performed individually from all objects selected, so it's possible to grow the selection out in steps by starting with an individual object, and hitting ctrl+enter individually for each step of growth desired. This is useful if you want to try and select a single room in a larger set of snapped rooms/halls, for example.
- ctrl+shift+enter Attempts to grow the selection as far as possible. This is useful for when you want to try and select all objects in a snapped set, and there are no superfluous pieces. For example, if you want to select all pieces in a continuous set of pipe.
Selection Painting[edit | edit source]
If you hold ctrl+shift and left-click & hold on a reference and you can "paint" your selection along several reference. If the first reference you start 'painting' on isn't selected then the painted references will be selected. If it is unselected then you will be deselecting references instead.
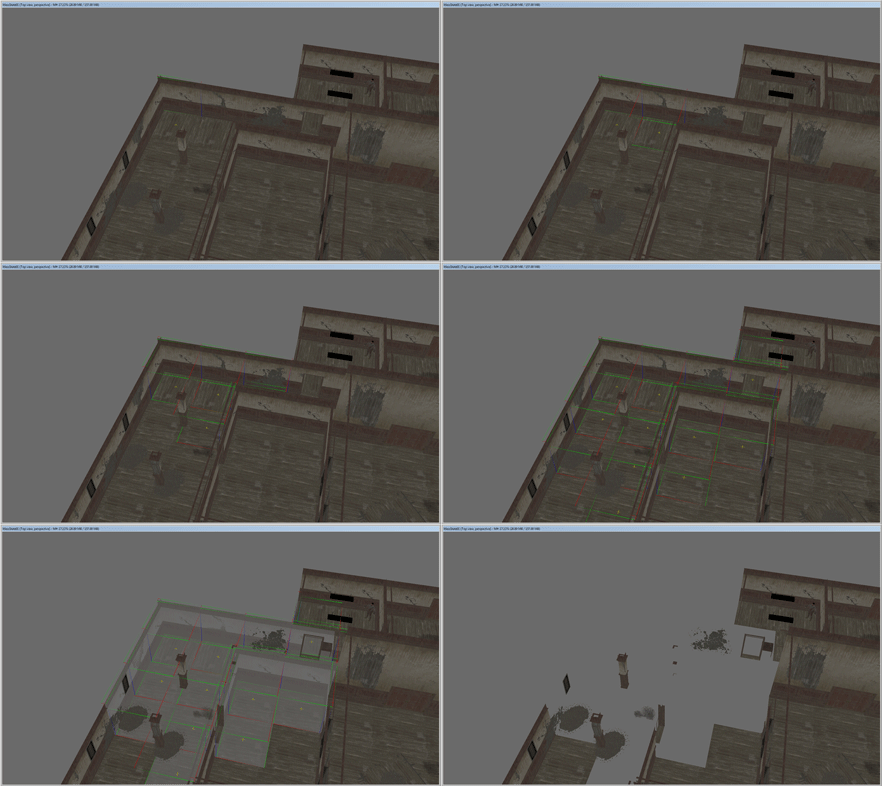
Selection Mask[edit | edit source]
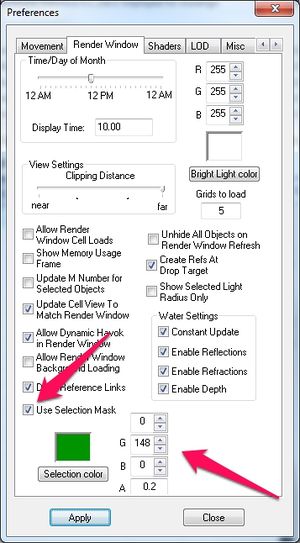
Toggling this on will highlight the currently selected object with a color/opacity of your choosing. These settings are located in you Render Window Properties, on the Render Window tab, at the bottom)
- Alt+V Will enable/disable Selection Mask.
- Suggested settings are R:0, G:148, B:0, A:0.2. These settings allow the mask to show up well in both light and dark scenes.
FBX Export[edit | edit source]
You can select references in the render window and export to an *.fbx file which can be viewed in 3dsMax.
Alpha Cutoff Scaling[edit | edit source]
Hold Alt-S, with the reference selected, then click and drag in the Render Window.
Hide Unselected Refs (Isolate Selection)[edit | edit source]
Alt-Shift-1 Will hide any ref that isn't currently selected. As usual, Alt-1 unhides everything.
[edit | edit source]
- 1 now hides selected triangles.
- Alt-1 will unhide all triangles.
Moving the Camera with References[edit | edit source]
Holding N while moving a reference will make the camera move with it.
Customizable Hotkeys[edit | edit source]
- You can now set custom hotkeys by going to Edit/Render Window Hotkeys, Selecting a Function from the list, then modifying the hotkey/modifiers and clicking the Assign Button. The Revert Button will change the selected hotkey back to it's default settings.
- There is also a Filter box so you can easily find the Function you are looking for.
Misc Editor Window Workflow[edit | edit source]
"Copy" Refs from Unloaded Cells[edit | edit source]
You can now select references in an unloaded cell via the "Cell View" window, then right click them and select the new "Copy" option in the drop down.
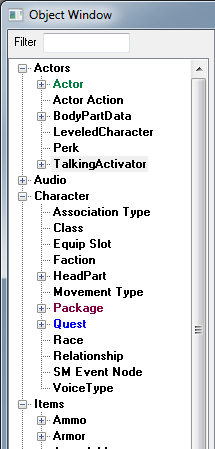
Object Window Colors[edit | edit source]
Object Types can be assigned a color for easier navigating. Go to View->Object Window Colors.
Quest Workflow[edit | edit source]
Set Stages on Topics and Scenes[edit | edit source]
A Parent Quest Stage can be set in a Scene (Phase Start/Complete, Scene Begin/End, and on Timers), or on a Topic when it Begins or Ends.
The drop down also shows the stage's description.

Quest Stage Notes[edit | edit source]
You can now put notes on each quest stage, which then show up next to the stage number, and in any stage select drop-down in the editor. (And when using SQS in the game console.)
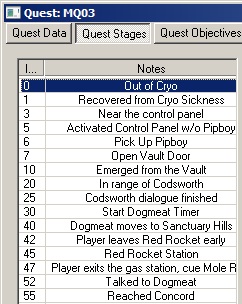
SQS now shows Quest Stage notes[edit | edit source]
Typing SQS (Show Quest Stages) now shows the Designer Quest Stage Notes.
GetStageDone Conditions show Quest Stage Notes[edit | edit source]
GetStageDone Conditions, in the Editor, now show Designer Quest Stage Notes.
[edit | edit source]
Making a Shared Info from a Scene (Make Shared Info button) will add the GetIsAliasRef automatically.
Run On Player option for Conditions[edit | edit source]
Can now run conditions on the player.
Start Up and Shutdown Flags Renamed[edit | edit source]
They are now named Run on Start? and Run on Stop?
Perk Conditions Renamed[edit | edit source]
Now called Level-Up Menu Conditions
Vendor Faction "NOT Buy/Sell" Renamed[edit | edit source]
Now called Buy/Sell Everything not in List?
Papyrus Workflow[edit | edit source]
Multiple Scripts Compile Much Faster[edit | edit source]
Scripts, when compiled at editor start or by compiling multiple from the Papyrus Script Manager, will now compile as many scripts at a time based on the amount of threads your PC has. This makes compiling scripts take a fraction of the time that it used to take, speeding up editor start times immensely.
Moveable Statics can now be Scripted[edit | edit source]
You can now attach scripts to Moveable Statics
Create Properties using a Form[edit | edit source]
You can now create a script property using a form (SCREENSHOT/SPECIFICS LATER)
Console Workflow[edit | edit source]
Display Contents of Formlist[edit | edit source]
DumpFormList "FormListName"
Call a Papyrus Function[edit | edit source]
- CallFunction console command let’s you fire off a Papyrus Function via the console, assuming the target object is scripted.(also CallQuestFunction/CallGlobalFunction)
- CallFunction
