imported>Dbbolton |
imported>Qazaaq |
| (10 intermediate revisions by 3 users not shown) |
| Line 1: |
Line 1: |
| [[Category:World Editing]] | | The '''navmesh''' represents the floor-space that [[Actor]]s use to navigate [[Cell]]s. |
| [[Category:Editor Interface]] | | Navmeshes are comprised of triangles, the triangles can hold data like a preferred path, submerged areas or cover for combat. |
| [[Image:NavmeshExample2.jpg|right|thumb|A typical interior cell navmesh]]
| | AI build better and more efficient paths based on data added to the Navmesh in the Editor or generated dynamically at runtime. |
|
| |
|
| =Navmeshes=
| | You can use the [http://www.creationkit.com/index.php?title=Navmesh_Cheat_Sheet Navmesh Cheat Sheet] for controls on the navmesh toolbar, to open the toolbar press <code>CTRL</code> + <code>E</code>. |
| '''Navmeshes''' represent the actual area that [[Actors]] can walk on. A Navmesh consists of a list of triangles (composed of verts and edges), derived data such as slope, and additional information like cover, preferred paths, and water areas. Navmeshes allows the AI to build better and more efficient paths based on data added to the Navmesh in the Editor or generated dynamically at runtime.
| |
|
| |
|
| For a basic introduction to creating Navmesh, see the [[Bethesda_Tutorial_Navmesh|Navmesh Tutorial]]. You should also familiarize yourself with the [[Navmesh Toolbar]] and [[Navmesh_Cheat_Sheet|Controls]].
| | === Scrappable Objects === |
| | In Fallout 4, a new feature has been added to the navmesh; the ability to remove a placed object in-game, with the navmesh allowing [[Actor]]s to now navigate through the freed up space. |
| | This is done by associating specific triangles in the navmesh with specific, intersecting objects that have the necessary [[FormList]] and [[Object Mod]] records that allows the player to scrap them in-game. |
|
| |
|
| ==Creating Navmesh==
| | To demonstrate this, the Commonwealth cell "FederalRationStockpileExt" will be used. |
| ===Hand-Built vs Generated Navmeshes===
| | [[File:Creation_Kit_-_Navmesh_-_Scrappable_Objects_001_-_Valid_Objects.png|200px|thumb|alt=Screenshot of an object that qualifies for scrapping & in-game navmesh updating|The CarStationWagon06 object has all the necessary records (in a FormList used by a Constructible Object) to be scrapped in-game, which also qualifies it to affect the navmesh when scrapped.]] |
| In the Creation Kit, you can choose to construct a Navmesh by hand or [[Navmesh_Generation|automatically generate it]]. During your initial work on a space, a quick [[Navmesh_Generation#Recast-Based_Generation|Recast-Generated]] Navmesh may be all you need for testing purposes. But automated generation will never produce the kind of clean, coherent Navmesh required for a level to perform well. Some amount of hand cleanup will always be required.
| |
|
| |
|
| There are pros and cons to each approach:
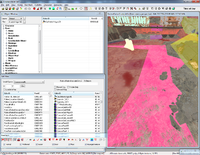
| | Select the object, and then press <code>CTRL</code> + <code>E</code> to enable navmesh editing. |
| * Building your Navmesh by hand usually produces the best and cleanest results. However, this can be time-consuming, especially until you become comfortable with the Navmesh controls.
| | At the top of the window, click <code>Navmesh</code>, then click <code>Link Precuts for Selection</code>. |
| * Generating a Navmesh, then cleaning it up, gives you a functional Navmesh quickly. For simple kit-based spaces, it's fairly easy to generate a good Navmesh early in the development process, then clean it up as you continue to develop and clutter the space. On the other hand, in complex, cluttered, or organic spaces, Navmesh Generation will often produce unusable results, and cleaning up a badly-generated Navmesh may be more time-consuming than building it by hand.
| |
|
| |
|
| ===Navmeshing Exteriors===
| | The navmesh will now have bright pink triangles; these are parts of the navmesh that are initially disabled, that the AI will navigate around. |
| When working in the exterior (or a [[Worldspace]]):
| | When the car object is scrapped, the triangles will then be enabled, allowing the AI to navigate through them. |
| * Remember that each Cell has distinct Navmesh(es). Navmesh verts cannot be moved outside of their initial cell.
| | [[File:Creation_Kit_-_Navmesh_-_Scrappable_Objects_002_-_Linked_Precuts.png|200px|thumb|alt=Screenshot of buggy navmesh editing; the selected car object should be visible, but isn't for some reason|The bright pink navmesh triangles are triangles that are initially disabled, and will be enabled once their linked object is scrapped.]] |
| * Make sure to Finalize your Navmesh. In order for exterior Navmeshes to finalize correctly, the verts on the borders of each cell must be aligned with corresponding verts in the adjacent cell. A green edge indicates that a connection has been made.
| |
| * Toggle cell borders by pressing [B]. The borders will be represented by dashed yellow lines on the terrain.
| |
| * Toggle Navmesh in surrounding cells by pressing [N]. Turning the surrounding Navmeshes off will increase performance and make it easier to work in the border regions, but make sure to turn them back on so you can align the border verts.
| |
| * You can also increase performance by reducing the number of Grids to Load under File -> Preferences -> Misc.
| |
| * When moving around in Navmesh Mode, it often takes a long time for cells to load. Press [F5] to force a reload.
| |
|
| |
|
| ==Navmesh Data==
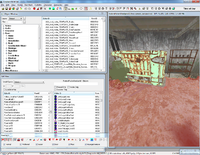
| | For some reason, this specific instance of the car object is not visible in navmesh editing mode, so it's hard to see why the car object takes up such a large area of the navmesh. |
| ===Cover===
| | The reason it does, is that it's bounding box intersects with those navmesh triangles, causing them to be linked to the object when we clicked <code>Link Precuts for Selection</code>. |
| Information about walls and cover points is encoded in the Navmesh to improve AI performance, especially in ranged combat. To add Cover data to your Navmesh, select '''Find Cover Edges''' from the [[Navmesh Toolbar]] or [[Navmesh Menu]].
| |
|
| |
|
| ===Water===
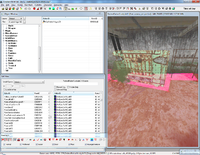
| | This can be resolved by essentially creating an empty space in the navmesh, around the object's bounding box, and then creating new navmesh triangles that better fit the car object. |
| Water Triangles (Blue) allow you to indicate an area of deep water. Some creatures will behave differently while in or around water.
| |
|
| |
|
| Note that, in areas of deep water, the Navmesh should always be placed on the ground surface (underwater) instead of on top of the water plane.
| | As a better way of visualizing how Precut Links should be done, take this example of the interior cell <code>FederalRationStockpile01</code>. |
| | In the first image, note how there is no navmesh around the scrappable objects. |
| | [[File:Creation_Kit_-_Navmesh_-_Scrappable_Objects_003_-_No_Precut_Links.png|200px|thumb|alt=Better example of navmesh not accommodating scrappable objects|As can be seen, the scrappable objects in this interior cell will have no affect on the navmesh when scrapped.]] |
|
| |
|
| '''To mark/unmark a triangle as Water, select the triangle(s) and press the ''"O"'' hotkey.'''
| | In the second image[[File:Creation_Kit_-_Navmesh_-_Scrappable_Objects_004_-_Proper_Precut_Links.png|200px|thumb|alt=Ideally made precut links|As we can see, the scrappable objects intersect cleanly with the navmesh triangles]], the navmesh now includes the area the objects are blocking, and since the objects have been linked to the navmesh, the AI will navigate through the areas the scrappable objects used to occupy, once they have been scrapped in-game. |
|
| |
|
| Note that triangles can be marked as ''both'' Water and Preferred. Such a triangle will be marked with a teal color.
| |
|
| |
|
| ====Auto Tagging Water Tris====
| | [[Category:Game Systems]] |
| Water Triangles can also be tagged automatically based on their depth below a water plane or procedural water.
| |
| <b> Ctrl + Alt + W</b> will run the auto tagging (currently the visuals do not change till the navmesh is refreshed by closing/opening or rolling the tri selection over them.
| |
| | |
| The following INI setting can be used to change the depth that is considered swimming by the auto tagging. This is also the default setting and is based on the player characters swim depth.
| |
| | |
| [NavmeshGeneration] | |
| fNavmeshWaterDepthOffset=89.6
| |
| | |
| ===Preferred Pathing===
| |
| Preferred Paths (Gold) have a lower 'cost' when evaluated by the AI, meaning that [[Actors]] will generally try to use those triangles instead of non-Preferred triangles. For example, triangles that lie on major roads are often marked as Preferred Paths to encourage Actors to follow them rather than taking a more direct off-road path.
| |
| | |
| '''To mark/unmark a triangle as Preferred, select the triangle(s) and press the ''"P"'' hotkey.'''
| |
| | |
| Note that triangles can be marked as ''both'' Water and Preferred. Such a triangle will be marked with a teal color.
| |
| | |
| ===Dropdowns===
| |
| Dropdown Edges (Pink) indicate a connection between two edges that allows an Actor to jump down from a higher ledge to a lower one. The AI will not evaluate the jump distance or other obstacles, so they may take damage or become stuck after the fall if the Navmesh is not positioned carefully.
| |
| | |
| Drop-down edges are taken into consideration when using navmesh [[Pathing Tests]].
| |
| | |
| '''To mark edges as dropdowns, select the top and bottom edges (in any order) and press ''"P"''.'''
| |
| | |
| This operation can only be performed on a per-case basis. For example: if you wish to mark a series of ten upper/lower edges as drop-down, you'll need to select each pair, press "P", and repeat on the next pair.
| |
| | |
| Note that finalizing a Navmesh will remove any dropdowns from the Navmesh, so you will need to recreate them.
| |
| | |
| ==Navmesh Cleanup==
| |
| ===Finding Errors===
| |
| When you save a new or modified Navmesh, you may get an error message about it. To fix Navmesh errors:
| |
| * Go to the cell the Navmesh is in and press [Ctrl+F] to search the Navmesh for errors.
| |
| ** Note that this will only check the ''current'' Navmesh. If your cell has multiple Navmeshes, you will need to search each of them individually.
| |
| ** If you are Navmeshing a large area, it may be useful to search for errors as you work.
| |
| <br>For a more detailed walkthrough about how to fix errors in a Navmesh, see the [[Bethesda_Tutorial_Navmesh|Tutorial]].
| |
| | |
| ===Finalizing Navmesh===
| |
| Finalizing Navmesh is generally the last thing done on a cell. If you edit a Navmesh, you should be sure to finalize it afterwards.
| |
| * After Finalizing Interiors and Exteriors, check each door to make sure that it has a green triangle nearby. When an [[Actor]] stands on that triangle, they can use the door. If no green triangle exists near a door, the AI will not be able to use the door.
| |
| * In Exteriors, Navmeshes must remain in their own cell. The Finalization process is used to connect the Navmeshes for each cell together at their borders.
| |
| **Make sure the edges of one exterior cell's Navmesh line up properly with those of the adjacent cells.
| |
| **Pressing "W" until in "Navmesh Only" view mode is helpful
| |
| **Pressing "N" if in single-cell Navmesh view mode will return to multi-cell view mode.
| |
| **Make sure that the border verts of the two Navmeshes line up in every way possible, including height.
| |
| **After finalizing, the Navmeshes should have thick green lines on their borders if properly linked together. If thick green lines do not appear on an edge where you expected them to, adjust the verts and edges and Finalize again.
| |
| **If you don't have thick green lines between adjacent exterior Navmeshes, '''Actors cannot path from one cell to the other.''' This is very bad, and will cause AI to behave poorly.
| |
The navmesh represents the floor-space that Actors use to navigate Cells.
Navmeshes are comprised of triangles, the triangles can hold data like a preferred path, submerged areas or cover for combat.
AI build better and more efficient paths based on data added to the Navmesh in the Editor or generated dynamically at runtime.
You can use the Navmesh Cheat Sheet for controls on the navmesh toolbar, to open the toolbar press CTRL + E.
In Fallout 4, a new feature has been added to the navmesh; the ability to remove a placed object in-game, with the navmesh allowing Actors to now navigate through the freed up space.
This is done by associating specific triangles in the navmesh with specific, intersecting objects that have the necessary FormList and Object Mod records that allows the player to scrap them in-game.
To demonstrate this, the Commonwealth cell "FederalRationStockpileExt" will be used.
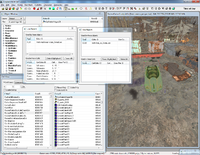
The CarStationWagon06 object has all the necessary records (in a FormList used by a Constructible Object) to be scrapped in-game, which also qualifies it to affect the navmesh when scrapped.
Select the object, and then press CTRL + E to enable navmesh editing.
At the top of the window, click Navmesh, then click Link Precuts for Selection.
The navmesh will now have bright pink triangles; these are parts of the navmesh that are initially disabled, that the AI will navigate around.
When the car object is scrapped, the triangles will then be enabled, allowing the AI to navigate through them.
The bright pink navmesh triangles are triangles that are initially disabled, and will be enabled once their linked object is scrapped.
For some reason, this specific instance of the car object is not visible in navmesh editing mode, so it's hard to see why the car object takes up such a large area of the navmesh.
The reason it does, is that it's bounding box intersects with those navmesh triangles, causing them to be linked to the object when we clicked Link Precuts for Selection.
This can be resolved by essentially creating an empty space in the navmesh, around the object's bounding box, and then creating new navmesh triangles that better fit the car object.
As a better way of visualizing how Precut Links should be done, take this example of the interior cell FederalRationStockpile01.
In the first image, note how there is no navmesh around the scrappable objects.
As can be seen, the scrappable objects in this interior cell will have no affect on the navmesh when scrapped.
In the second image
As we can see, the scrappable objects intersect cleanly with the navmesh triangles
, the navmesh now includes the area the objects are blocking, and since the objects have been linked to the navmesh, the AI will navigate through the areas the scrappable objects used to occupy, once they have been scrapped in-game.


