Scripting AddItem Holotape Using OnMenuOpenCloseEvent
Overview[edit | edit source]
This tutorial is designed to teach the reader to add a Quest item, in this case a Holotape, to the player inventory when the player opens the PipboyMenu.
There are several ways to do this. This is but one example.
The reader will learn:
- How to set up a simple, "dummy" Quest
- How to create a Reference Alias
- How to fill that Reference Alias with a quest script
The Quest[edit | edit source]
The quest will need to be enabled at start, will have two stages, and will contain a reference alias with a Specific Reference Fill Type. It is not designed to show up in the player menu so it will not have a Type, Location, or a Quest Group. The script is designed to stop the quest after which time the object can be dropped by the player.
First, let's create the quest.
- In the Object Window, navigate to Character > Quests
- On any of the quests on the right panel, Right Click > New
- Give the quest a unique Editor ID (EDID) and a name.
For purposes of this tutorial, we've named it OLT_HolotapeOnOpenCloseMenuQuest. Because it is a "dummy" Quest that will not show in the player inventory and will only run "behind the scenes," you can give a brief description of what the quest does for your eyes only.
The quest we are creating will be set to Start Game Enabled, and we only want the quest to run once so OnInit will not fire twice.
- Check the boxes for Start Enabled, Run Once, and Warn on Alias Failure
- Leave the priority at 0. While the quest has a Reference Alias, it does not have dialogue, so dialogue and AI package overrides to vanilla NPCs should not be an issue.
- Fill in a namespace under Object Window Filter so that you can easily find it in the Script Objects panel of the Object Window.
Note:
- The Quest form only gives a few tabs when first creating a quest. You'll need to save it after initial creation in order to fully edit it.
- For easy reference later, make use of the Object Window Filter. You'll be able to easily go to Character > Quests > YourNamespace to find your new quest.
- If you do not have your Warnings visible in case of Alias fill failure, navigate to View > Warnings. Setting a Layout color for the warnings window for
<CURRENT>warnings, will allow you to easily find the warning and double click on it. Most warnings will pop up the form where the warning is located.- If "Start Game Enabled" is not also flagged to "Run Once," the OnInit() Event will fire twice.
We're done with the initial set up of our quest.
- Click "Ok" to save and close the quest to refresh it.
Quest Stages[edit | edit source]
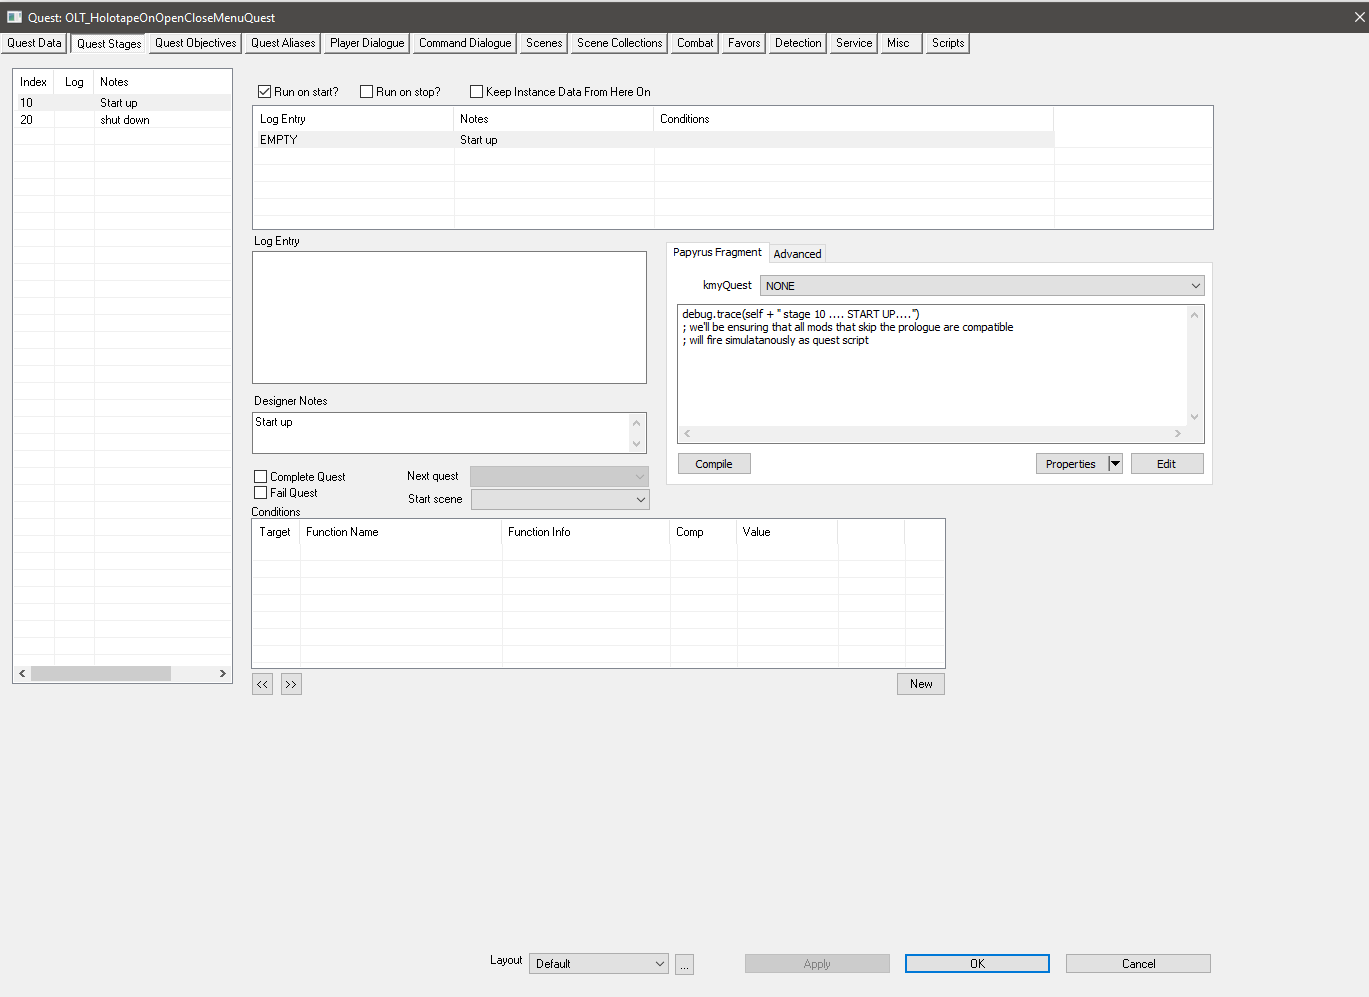
Now let's set up the quest stages. There are two: Stage 10 and Stage 20.
- Return to the new Quest. All tabs available for quest creation are now shown.
- Navigate to the Quest Stages tab
The first stage is set up to run on start with a simple Debug trace for Papyrus Logging.
Stage 10:
- Check the box for "Run on Start".
- On the left panel Right Click > New to add a new index.
- Fill in the index number with "10".
- On the stage items panel Right Click > New to add the new entry to the stage index.
- Add designer notes, such as "Start Up".
- Add the following papyrus fragment:
Stage 10 Papyrus Fragment[edit | edit source]
The Quest Stage Fragment for this quest is as follows:
debug.trace(self + "stage 10 - start up")- Click compile
- Click "OK" to save and close the Quest to save the new fragment.
Renaming the fragment
For organizational purposes and efficient asset tracking for both the mod author and end-user, we're going to rename the fragment with our mod's unique namespace. Namespaces are subfolders within the data folder where the fragment will be output by the editor.
- Return to your quest.
- Navigate to Quest Stages and click on the Advanced tab.
- click Rename Script.
- For tutorial purposes, rename the script to
QF_OLT_HolotapeOnOpenCloseMenuScriptand the Namespace toOLT:Example:Fragments:Quests. - Click Papyrus Fragment tab and click "Compile."
- Click "Ok" to save and exit the Quest tab to refresh the script fragment.
Note
- You will not have to do any renaming for the next fragment. Everything will be set up for data entry.
- If you want the quest item to remain persistent, do not add stage 20.
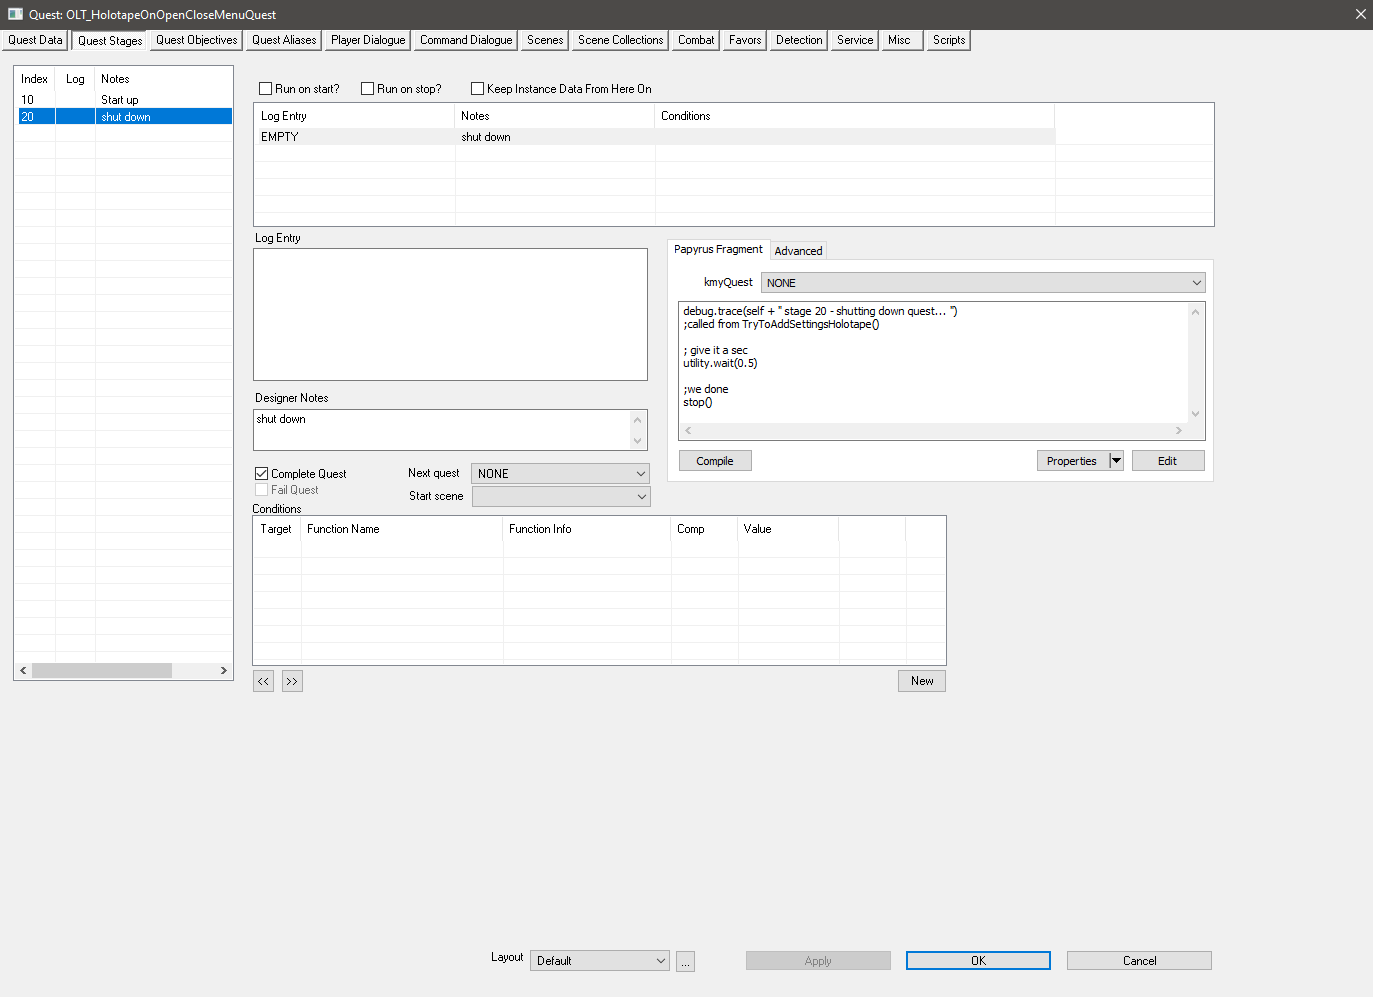
Stage 20:
- On the left panel Right Click > New to add a new index.
- Fill in the index number with "20".
- On the stage items panel Right Click > New to add the new entry to the stage index.
- Add designer notes, such as "Shut down".
- Check the box for "Complete Quest".
- Add the following papyrus fragment:
Stage 20 Papyrus Fragment[edit | edit source]
debug.trace(self + "stage 20 - shutting down")

;stop quest
Stop()
This will complete the quest once the Quest script has run its functions.
- Click "Compile".
- Click "Ok" to save quest and new fragment number.
Reference Alias[edit | edit source]
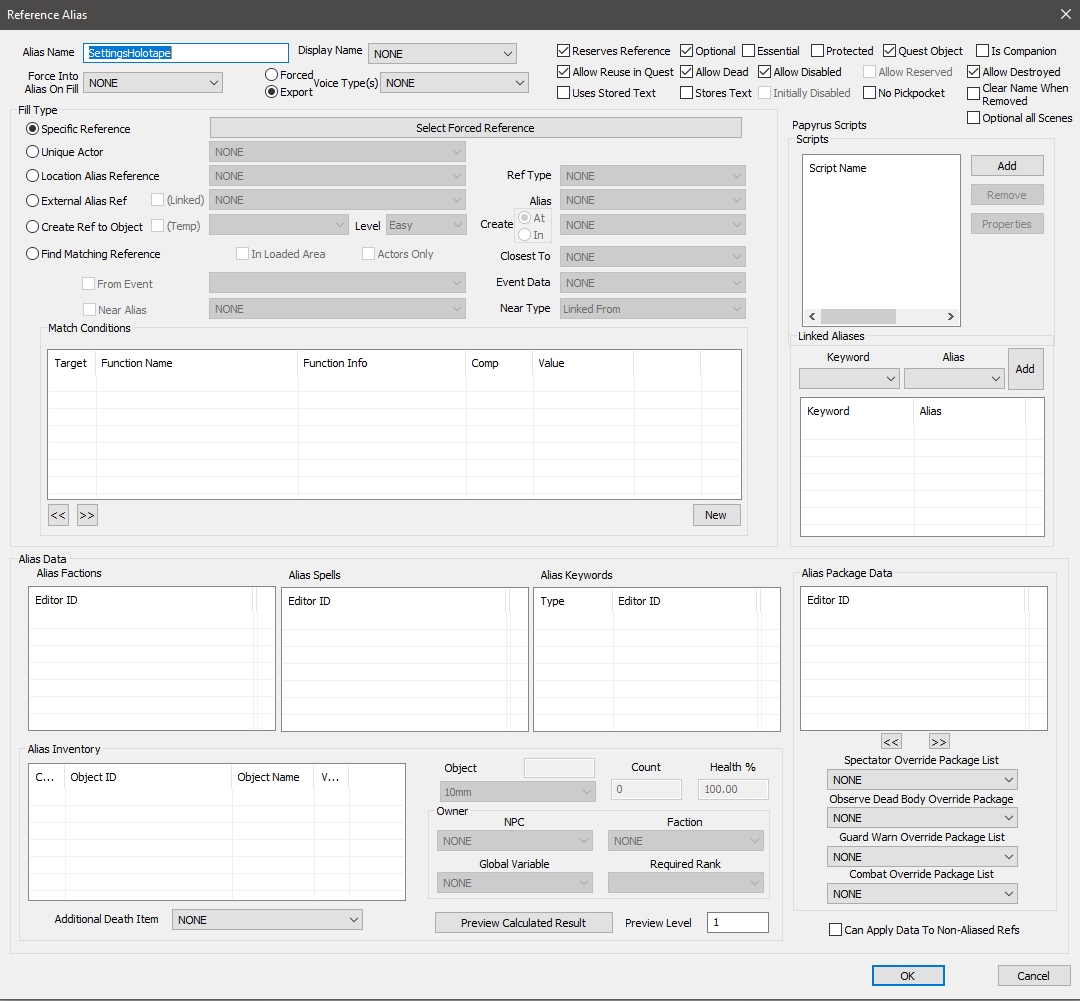
Now let's set up the persistent reference.
- Return to your quest and navigate to the Quest Aliases tab
- Create a Reference Alias by Right Click > New Reference Alias. For purposes of this example, the name of the alias is
SettingsHolotape. - Fill type: Specific Reference (none).
- Check: Optional, Quest Object, Reserves Reference, Allow Reuse in Quest, Allow Disabled
- Click "Ok" to save and exit the Reference Alias window and "Ok" on the quest to save and refresh the quest.
The Quest Script[edit | edit source]
- Open the quest and Navigate to the Scripts Tab.
- Click "Add" to attach a new script to the quest.
- Select [New Script] and Click "Ok."
- Give your script a new name and add it to your mod's Namespace.
- Copy and paste the following code (rename "YourNameSpace" to the Namespace of your mod):
Scriptname YourNameSpace:AddHolotapeOnMenuOpenCloseScript extends Quest

Group Required_Properties

	Holotape Property HolotapeRef auto const
	{the holotape we're forcing into the player inventory}
	ReferenceAlias Property Alias_SettingsHolotape auto const mandatory
	{autofill}
	Actor Property PlayerRef auto const mandatory
	{autofill}

	int Property StageToSet = 20 auto const
	{default stage = 20 - only change this number if using a different shutdown stage number}

EndGroup

;holotapes in the inventory
int maxHolotapeCount = 1 const

Event OnQuestInit()

	; Register for the pipboy opening
	RegisterForMenuOpenCloseEvent("PipboyMenu")

	; wait for player input
	while utility.IsInMenuMode()
		utility.wait(0.2)
	endwhile

EndEvent


Event OnMenuOpenCloseEvent(string asMenuName, bool abOpening)

	if (asMenuName == "PipboyMenu")

		if abOpening
			Debug.Trace(self + " PlayerRef has opened " + asMenuName)

			;Add the holotape
			TryToAddSettingsHolotape()

			;comment this section out if you wish the holotape to remain a persistent quest item

			; we done
            SetStage(StageToSet)
         endif
	endif

endEvent

Function TryToAddSettingsHolotape()

	ObjectReference TapeRef = PlayerRef.PlaceAtMe(HolotapeRef)
	Alias_SettingsHolotape.ForceRefTo(TapeRef)

    ;count the amount of actual tapes instead of the ref
	int currentCount = PlayerRef.GetItemCount(HolotapeRef)

	if currentCount < maxHolotapeCount
		PlayerRef.AddItem(TapeRef, maxHolotapeCount, false)
		debug.trace(self + "Holotape has been added to player inventory")
	endif

EndFunction- Compile your script by clicking Ctrl + S.
Usage[edit | edit source]
- This is specifically for compatibility with mods that skip the prologue but should also work during debug if coc'ing directly from main menu with default character.
Customization[edit | edit source]
- If you do not want a pop-up indicating the player has received the holotape, change
PlayerRef.AddItem(TapeRef, maxHolotapeCount, false)toPlayerRef.AddItem(TapeRef, maxHolotapeCount, true). See AddItem_-_ObjectReference.
- If you want the quest item to remain persistent and cannot be dropped and lost by the player, comment out
SetStage(StageToSet)and do not create stage 20.


