Difference between revisions of "Category:Editor Interface"
imported>Qazaaq |
imported>Qazaaq |
||
| Line 1: | Line 1: | ||
{{Inaccurate Article}}{{Incomplete Article}} | |||
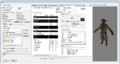
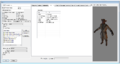
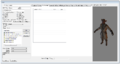
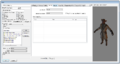
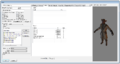
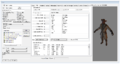
The [[Creation Kit]] is the primary tool for creating and editing [[Data File]]s. | The [[Creation Kit]] is the primary tool for creating and editing [[Data File]]s. | ||
Here you can find information about all the windows and dialogs you may encounter while using the toolset. | Here you can find information about all the windows and dialogs you may encounter while using the toolset. | ||
[[File:CreationKit Editor.png|600px]] | [[File:CreationKit Editor.png|600px]] | ||
= File Menu = | |||
A menu bar that displays commands and options from a drop-down menu. | |||
The file menu is located in the upper left hand corner of the [[Creation Kit]] and is used for managing loaded data files (.ESMs and .ESPs), importing/exporting of data, checking data validity and managing [[Archive File]]s. | |||
== File == | |||
This menu has options for loading and saving your plug-in, as well as exporting and importing data. It also contains the preferences link. | |||
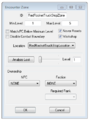
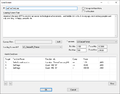
*'''Data...:''' Opens the [[Data Window]]. | |||
*'''Save:''' Saves any changes you've made to the current ''Active file''. If you haven't specified an active file in the [[Data Window]], you will be prompted for a new filename to save your changes to. All changes will be saved to a plug-in file (FILENAME.esp) based on the current master file. | |||
**Note: Plugin files cannot contain any reserved characters, such as "(" or ")", or when attempting to select them the loader will not recognize them as valid plugins. To remove this error, simply rename the plugin to not contain reserved characters. | |||
*'''Save and Push Plugin to PC:''' | |||
*'''Import/Export:''' Allows you to export data into tab delimited text files. Used for localization during development. | |||
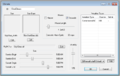
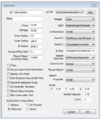
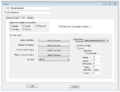
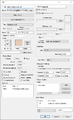
*'''Preferences:''' Allows you to set preferences for various aspects of the editor, mainly having to do with how the [[Render Window]] looks and operates. | |||
*'''Validate Loaded Data:''' Validate Loaded Data runs a check through the loaded plug-in and master files to check for errors in how the data is set up. This check is also run automatically when the [[Creation Kit]] finishes loading the data selected; this is just a way to run that check without having to reload the data. | |||
*'''Create Archive:''' | |||
*'''Upload Plugin and Archive to Bethesda.net:''' | |||
*'''Compact Active File Form IDs:''' | |||
*'''Convert Active File to Light Master:''' | |||
*'''Login to Bethesda.net...:''' | |||
*'''Logout:''' | |||
*'''Exit:''' Closes the editor. If you have made any changes since your last save, you will be prompted to save before exiting. | |||
== Edit == | |||
Undo/Redo, Copy/Paste and other essential functions live here, which we will mostly access via [[Creation Kit Interface Cheat Sheet]]. | |||
*'''Undo:''' | |||
*'''Redo:''' | |||
*'''Cut Render:''' | |||
*'''Copy Render:''' | |||
*'''Paste Render:''' | |||
*'''Paste in Place:''' | |||
*'''Duplicate:''' | |||
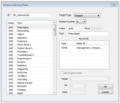
*'''Search & Replace...:''' | |||
*'''Find Text:''' | |||
*'''Render Window Hotkeys:''' | |||
*'''Render Window Picking Preferences:''' | |||
== View == | |||
Options here largely control how the Render Window behaves, and will be useful during more complex tasks. | |||
*'''Toolbar:''' | |||
*'''Statusbar:''' | |||
*'''Object Window:''' | |||
*'''Cell View Window:''' | |||
*'''Scene Info Window:''' | |||
*'''Open Windows...:''' | |||
*'''Preview Window:''' | |||
*'''Show/Hide Window:''' | |||
*'''Reference Batch Action Window:''' | |||
*'''Layers...:''' | |||
*'''Material Palette:''' | |||
*'''Object Window Layouts:''' | |||
*'''Current Cell Only:''' | |||
*'''Markers:''' | |||
*'''Light Markers:''' | |||
*'''Sound Markers:''' | |||
*'''Light Radius:''' | |||
*'''Wireframe:''' | |||
*'''Bright Light:''' | |||
*'''Sky:''' | |||
*'''Grass:''' | |||
*'''Fog:''' | |||
*'''Collision Geometry:''' | |||
*'''Leaves:''' | |||
*'''Trees:''' | |||
*'''Occlusion Planes:''' | |||
*'''Isometric:''' | |||
*'''Top:''' | |||
*'''Depth Biasing:''' | |||
*'''Refresh Render Window:''' | |||
*'''Warnings:''' | |||
*'''Properties:''' | |||
== World == | |||
This menu collects many tools for manipulating aspects of the game world. | |||
== NavMesh == | |||
Users familiar with Fallout 3's GECK will remember navmesh, our central tool for AI navigation through an environment. This menu holds our various tools for creating and manipulating this valuable functionality. | |||
== Character == | |||
These tools are mostly for the manipulation of character behavior and beyond the scope of this initial tutorial. | |||
== Gameplay == | |||
These advanced settings can have game-wide effects and are also beyond the scope of this tutorial. | |||
== Help == | |||
Simple version information and a link to this wiki! | |||
= Toolbar = | |||
The main toolbar includes a set of buttons as shortcuts for commonly used functions from the menus. | |||
=== General Buttons === | |||
*[[image:jbrowne_IconVersionControl.jpeg]] '''Version Control''' | |||
*[[image:IconLoad.png]] '''Load Master/Plugin files''' | |||
*[[image:IconSave.png]] '''Save Plug-in''' | |||
*[[image:IconPreferences.png]] '''Preferences''' | |||
*[[image:IconUndo.png]] '''Undo''' | |||
*[[image:IconRedo.png]] '''Redo''' | |||
*[[image:IconSnaptoGrid.png]] '''Snap to Grid''' | |||
*[[image:IconSnaptoAngle.png]] '''Snap to Angle''' | |||
*[[image:IconLocalTrans.png]] '''Local Gizmo Orientation''' | |||
*[[image:IconHeightmap.png]] '''World (Heightmap) Editing''' | |||
*[[image:IconLandscape.png]] '''Landscape Editing''' | |||
*[[image:IconHavok.png]] '''Run Havok Sim''' | |||
*[[image:IconFX.png]] '''Animate Lights and Effects''' | |||
*[[image:IconLights.png]] '''Brighten Lights''' | |||
*[[image:IconSky.png]] '''Enable Sky''' | |||
*[[image:IconGrass.png]] '''Toggle Grass''' | |||
*[[image:IconDialog.png]] '''Open Filtered Dialogue Window''' | |||
=== Navmesh Buttons === | |||
*[[image:IconNavmeshMode.png]] '''[[Navmesh_Toolbar|Navmesh Mode]]''' | |||
=== Level Design Buttons === | |||
*[[image:IconTrigger.png]] '''Create a cubic activator:''' Helps build a cube-shaped trigger. | |||
*[[image:IconMultiboundCube.png]] '''Create a cubic multibound:''' Helps build a cube-shaped multibound for scenegraph culling. | |||
*[[image:IconMultiboundSphere.png]] '''Create a spherical multibound:''' Allows user to create a sphere-shaped multibound for scenegraph culling. | |||
*[[image:IconOcclusionPlane.png]] '''Create an occlusion plane:''' Allows user to place an occlusion plane for scenegraph culling. | |||
*[[image:IconOcclusionCube.png]] '''Create an occlusion cube:''' Allows user to place an occlusion cube for scenegraph culling. | |||
*[[image:IconJoinBreakPlanes.png]] '''Join or break planes:''' Allows user to combine or separate two occlusion planes | |||
*[[image:IconRoom.png]] '''Create a room:''' Allows users to draw a roombound form around objects in a room to form a group | |||
*[[image:IconPortalMode.png]] '''Toggle Portal Mode''' Prepares the render window for manipulation of portals | |||
*[[image:IconPortalCreate.png]] '''Draw a portal:''' Allows users to draw a portal object | |||
*[[image:IconPortalLink.png]] '''Link portal to room:''' Allows users to link two rooms with a portal object | |||
*[[image:IconPortalDetach.png]] '''Detach portal from room:''' Allows users to detach a previously linked portal | |||
=== Sound Design Buttons === | |||
*[[image:IconSoundEmitter.png]] '''Create a sound emitter:''' Allows users to select and place a sound emitter in the render window | |||
*[[image:IconAcousticSpace.png]] '''Create an Acoustic Space:''' Creates a drawn space where users can play a unique sound/music clip in a unique location | |||
=== Collision Buttons === | |||
*[[image:IconCollisionPlane.png]] '''Create a collision plane:''' Allows users to place a flat collision plane | |||
*[[image:IconCollisionCube.png]] '''Create a collision cube:''' Allows users to place a cube shaped collision plane | |||
*[[image:IconCollisionSphere.png]] '''Create a collision sphere:''' Allows users to place a sphere shaped collision plane | |||
=== Current Buttons === | |||
*[[image:IconCurrentPlane.png]] '''Create a current plane:''' Allows users to place a current plane to create drift | |||
*[[image:IconCurrentCube.png]] '''Create a current cube:''' Allows users to place a cube shaped current object | |||
*[[image:IconCurrentSphere.png]] '''Create a current sphere:''' Allows users to place a sphere shaped current object | |||
[[Category:Editor Reference]] | [[Category:Editor Reference]] | ||
Revision as of 00:46, 10 December 2018
| This article has been flagged as inaccurate. |
| Please help improve the wiki by learning how to contribute. |
| This article has been flagged as incomplete. |
| Please help improve the wiki by learning how to contribute. |
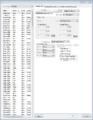
The Creation Kit is the primary tool for creating and editing Data Files. Here you can find information about all the windows and dialogs you may encounter while using the toolset.

File Menu
A menu bar that displays commands and options from a drop-down menu. The file menu is located in the upper left hand corner of the Creation Kit and is used for managing loaded data files (.ESMs and .ESPs), importing/exporting of data, checking data validity and managing Archive Files.
File
This menu has options for loading and saving your plug-in, as well as exporting and importing data. It also contains the preferences link.
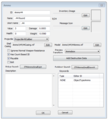
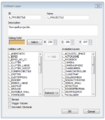
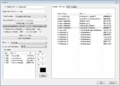
- Data...: Opens the Data Window.
- Save: Saves any changes you've made to the current Active file. If you haven't specified an active file in the Data Window, you will be prompted for a new filename to save your changes to. All changes will be saved to a plug-in file (FILENAME.esp) based on the current master file.
- Note: Plugin files cannot contain any reserved characters, such as "(" or ")", or when attempting to select them the loader will not recognize them as valid plugins. To remove this error, simply rename the plugin to not contain reserved characters.
- Save and Push Plugin to PC:
- Import/Export: Allows you to export data into tab delimited text files. Used for localization during development.
- Preferences: Allows you to set preferences for various aspects of the editor, mainly having to do with how the Render Window looks and operates.
- Validate Loaded Data: Validate Loaded Data runs a check through the loaded plug-in and master files to check for errors in how the data is set up. This check is also run automatically when the Creation Kit finishes loading the data selected; this is just a way to run that check without having to reload the data.
- Create Archive:
- Upload Plugin and Archive to Bethesda.net:
- Compact Active File Form IDs:
- Convert Active File to Light Master:
- Login to Bethesda.net...:
- Logout:
- Exit: Closes the editor. If you have made any changes since your last save, you will be prompted to save before exiting.
Edit
Undo/Redo, Copy/Paste and other essential functions live here, which we will mostly access via Creation Kit Interface Cheat Sheet.
- Undo:
- Redo:
- Cut Render:
- Copy Render:
- Paste Render:
- Paste in Place:
- Duplicate:
- Search & Replace...:
- Find Text:
- Render Window Hotkeys:
- Render Window Picking Preferences:
View
Options here largely control how the Render Window behaves, and will be useful during more complex tasks.
- Toolbar:
- Statusbar:
- Object Window:
- Cell View Window:
- Scene Info Window:
- Open Windows...:
- Preview Window:
- Show/Hide Window:
- Reference Batch Action Window:
- Layers...:
- Material Palette:
- Object Window Layouts:
- Current Cell Only:
- Markers:
- Light Markers:
- Sound Markers:
- Light Radius:
- Wireframe:
- Bright Light:
- Sky:
- Grass:
- Fog:
- Collision Geometry:
- Leaves:
- Trees:
- Occlusion Planes:
- Isometric:
- Top:
- Depth Biasing:
- Refresh Render Window:
- Warnings:
- Properties:
World
This menu collects many tools for manipulating aspects of the game world.
Users familiar with Fallout 3's GECK will remember navmesh, our central tool for AI navigation through an environment. This menu holds our various tools for creating and manipulating this valuable functionality.
Character
These tools are mostly for the manipulation of character behavior and beyond the scope of this initial tutorial.
Gameplay
These advanced settings can have game-wide effects and are also beyond the scope of this tutorial.
Help
Simple version information and a link to this wiki!
Toolbar
The main toolbar includes a set of buttons as shortcuts for commonly used functions from the menus.
General Buttons
- File:Jbrowne IconVersionControl.jpeg Version Control
- File:IconLoad.png Load Master/Plugin files
- File:IconSave.png Save Plug-in
- File:IconPreferences.png Preferences
- File:IconUndo.png Undo
- File:IconRedo.png Redo
- File:IconSnaptoGrid.png Snap to Grid
- File:IconSnaptoAngle.png Snap to Angle
- File:IconLocalTrans.png Local Gizmo Orientation
- File:IconHeightmap.png World (Heightmap) Editing
- File:IconLandscape.png Landscape Editing
- File:IconHavok.png Run Havok Sim
- File:IconFX.png Animate Lights and Effects
- File:IconLights.png Brighten Lights
- File:IconSky.png Enable Sky
- File:IconGrass.png Toggle Grass
- File:IconDialog.png Open Filtered Dialogue Window
Level Design Buttons
- File:IconTrigger.png Create a cubic activator: Helps build a cube-shaped trigger.
- File:IconMultiboundCube.png Create a cubic multibound: Helps build a cube-shaped multibound for scenegraph culling.
- File:IconMultiboundSphere.png Create a spherical multibound: Allows user to create a sphere-shaped multibound for scenegraph culling.
- File:IconOcclusionPlane.png Create an occlusion plane: Allows user to place an occlusion plane for scenegraph culling.
- File:IconOcclusionCube.png Create an occlusion cube: Allows user to place an occlusion cube for scenegraph culling.
- File:IconJoinBreakPlanes.png Join or break planes: Allows user to combine or separate two occlusion planes
- File:IconRoom.png Create a room: Allows users to draw a roombound form around objects in a room to form a group
- File:IconPortalMode.png Toggle Portal Mode Prepares the render window for manipulation of portals
- File:IconPortalCreate.png Draw a portal: Allows users to draw a portal object
- File:IconPortalLink.png Link portal to room: Allows users to link two rooms with a portal object
- File:IconPortalDetach.png Detach portal from room: Allows users to detach a previously linked portal
Sound Design Buttons
- File:IconSoundEmitter.png Create a sound emitter: Allows users to select and place a sound emitter in the render window
- File:IconAcousticSpace.png Create an Acoustic Space: Creates a drawn space where users can play a unique sound/music clip in a unique location
Collision Buttons
- File:IconCollisionPlane.png Create a collision plane: Allows users to place a flat collision plane
- File:IconCollisionCube.png Create a collision cube: Allows users to place a cube shaped collision plane
- File:IconCollisionSphere.png Create a collision sphere: Allows users to place a sphere shaped collision plane
Current Buttons
- File:IconCurrentPlane.png Create a current plane: Allows users to place a current plane to create drift
- File:IconCurrentCube.png Create a current cube: Allows users to place a cube shaped current object
- File:IconCurrentSphere.png Create a current sphere: Allows users to place a sphere shaped current object
Pages in category "Editor Interface"
The following 15 pages are in this category, out of 15 total.
Media in category "Editor Interface"
The following 200 files are in this category, out of 281 total.
(previous page) (next page)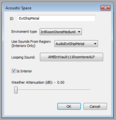 Acoustic Space Editor.png 360 × 373; 12 KB
 Acoustic Space EditorIcon.png 16 × 16; 383 bytes
 Activator Editor.png 1,388 × 617; 52 KB
 Activator EditorIcon.png 16 × 16; 354 bytes
 Actor Action EditorIcon.png 16 × 16; 329 bytes
 Actor Action Object.PNG 467 × 316; 9 KB
 Actor AI Data Editor.png 1,291 × 694; 106 KB
 Actor AI Packages Editor.png 1,291 × 693; 110 KB
 Actor Animation Editor.png 1,291 × 691; 104 KB
 Actor Attack Data Editor.png 1,291 × 691; 111 KB
 Actor Character Gen Morphs Editor.png 1,291 × 692; 118 KB
 Actor Character Gen Parts Editor.png 1,291 × 691; 126 KB
 Actor Editor.png 1,291 × 692; 129 KB
 Actor EditorIcon.png 16 × 16; 352 bytes
 Actor Factions Editor.png 1,291 × 691; 106 KB
 Actor Inventory Editor.png 1,291 × 690; 112 KB
 Actor Keywords Editor.png 1,291 × 690; 106 KB
 Actor Relationships Editor.png 1,292 × 692; 103 KB
 Actor Sounds Editor.png 1,291 × 692; 105 KB
 Actor SpellList Editor.png 1,291 × 692; 106 KB
 Actor Stats Editor.png 1,293 × 694; 116 KB
 Actor Templates Editor.png 1,292 × 692; 112 KB
 Actor Traits Editor.png 1,292 × 691; 113 KB
 Actor Value Editor.png 320 × 632; 16 KB
 AddOnNode EditorIcon.png 16 × 16; 370 bytes
 AimModel Editor.png 715 × 376; 18 KB
 AimModel EditorIcon.png 16 × 16; 306 bytes
 Ammo Editor.png 546 × 608; 28 KB
 Ammo EditorIcon.png 16 × 16; 323 bytes
 Animate Lights and Effects Icon.png 16 × 16; 355 bytes
 AnimObject Editor.png 419 × 264; 13 KB
 AnimObject EditorIcon.png 16 × 16; 334 bytes
 Armor EditorIcon.png 16 × 16; 580 bytes
 ArmorAddon Editor.png 610 × 667; 30 KB
 ArmorAddon EditorIcon.png 16 × 16; 574 bytes
 Art Object Editor.png 660 × 453; 24 KB
 Art Object EditorIcon.png 16 × 16; 294 bytes
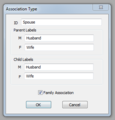 Association Type Editor.png 332 × 347; 13 KB
 Association Type EditorIcon.png 16 × 16; 311 bytes
 AttractionRule Editor.png 474 × 247; 12 KB
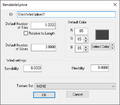 BendableSpline Editor.png 398 × 349; 6 KB
 BendableSpline EditorIcon.png 16 × 16; 296 bytes
 BodyPartData EditorIcon.png 16 × 16; 342 bytes
 Book EditorIcon.png 16 × 16; 352 bytes
 CameraShot EditorIcon.png 16 × 16; 327 bytes
 Cell Editor.png 750 × 968; 52 KB
 Cell Interior Common Data Editor.png 750 × 968; 59 KB
 Cell Interior Data Editor.png 750 × 968; 51 KB
 Cell Interior Directional Ambient Lighting Editor.png 750 × 968; 56 KB
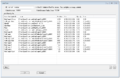
 Cell View Window.png 1,818 × 891; 123 KB
 Class Editor.png 571 × 700; 17 KB
 Class EditorIcon.png 16 × 16; 309 bytes
 Climate Editor.png 705 × 446; 21 KB
 Climate EditorIcon.png 16 × 16; 307 bytes
 Collision Layer Editor.png 465 × 530; 24 KB
 Collision Layer EditorIcon.png 16 × 16; 287 bytes
 ColorForm EditorIcon.png 16 × 16; 299 bytes
 CombatStyle CloseRange Editor.png 645 × 770; 37 KB
 CombatStyle Cover Editor.png 652 × 776; 26 KB
 CombatStyle EditorIcon.png 16 × 16; 330 bytes
 CombatStyle Flight Editor.png 646 × 768; 30 KB
 CombatStyle General Editor.png 646 × 771; 31 KB
 CombatStyle LongRange Editor.png 651 × 775; 30 KB
 CombatStyle Melee Editor.png 649 × 773; 34 KB
 CombatStyle Ranged Editor.png 649 × 776; 26 KB
 Component Editor.png 283 × 263; 5 KB
 Component EditorIcon.png 16 × 16; 294 bytes
 Condition Editor.png 735 × 205; 4 KB
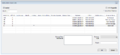
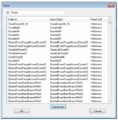
 Condition Function.png 838 × 378; 108 KB
 Condition Item Editor.png 869 × 142; 10 KB
 Constructible Object Editor.PNG 1,016 × 590; 24 KB
 Constructible Object EditorIcon.png 16 × 16; 311 bytes
 Container Editor.png 1,296 × 811; 211 KB
 Container EditorIcon.png 16 × 16; 464 bytes
 Create a Box Light Icon.png 16 × 16; 342 bytes
 Create a Collision Cube Icon.png 16 × 16; 311 bytes
 Create a Collision Plane Icon.png 16 × 16; 295 bytes
 Create a Collision Sphere Icon.png 16 × 16; 307 bytes
 Create a Current Cube Icon.png 16 × 16; 312 bytes
 Create a Current Plane Icon.png 16 × 16; 298 bytes
 Create a Current Sphere Icon.png 16 × 16; 304 bytes
 Create a Multibound Cube Icon.png 16 × 16; 311 bytes
 Create a Multibound Sphere Icon.png 16 × 16; 311 bytes
 Create a Portal Icon.png 16 × 16; 289 bytes
 Create a Roombound Icon.png 16 × 16; 297 bytes
 Create a Sound Emitter Icon.png 16 × 16; 318 bytes
 Create an Acoustic Space Icon.png 16 × 16; 337 bytes
 Create an LOD Clip Volume Icon.png 16 × 16; 355 bytes
 Create an Occlusion Cube.png 16 × 16; 306 bytes
 Create an Occlusion Plane Icon.png 16 × 16; 294 bytes
 Create Trigger Icon.png 16 × 16; 308 bytes
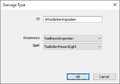 Damage Type Editor.png 385 × 269; 4 KB
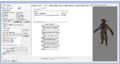
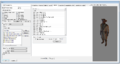
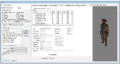
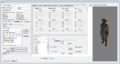
 Data File Details Info Window GIF.gif 375 × 550; 2.93 MB
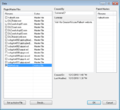
 Data File Details Info Window.png 272 × 600; 16 KB
 Data File Details Mark As Ignored Window.png 496 × 229; 10 KB
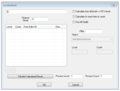
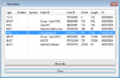 Data File Details Window v2.png 529 × 342; 15 KB
 Data File Load Icon.png 16 × 16; 339 bytes
 Data File Save - Hotload PC Icon.png 16 × 16; 376 bytes
 Data File Save - Hotload Playstation Icon.png 16 × 16; 384 bytes
 Data File Save - Hotload Xbox Icon.png 16 × 16; 389 bytes
 Data File Save Icon.png 16 × 16; 315 bytes
 Data Window.png 642 × 586; 24 KB
 Debris EditorIcon.png 16 × 16; 359 bytes
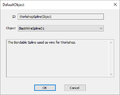 DefaultObject Editor.png 406 × 321; 5 KB
 DefaultObject EditorIcon.png 16 × 16; 299 bytes
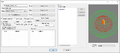
 Destructible Object Data Editor.png 1,048 × 476; 26 KB
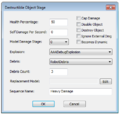 Destructible Object Stage Editor.png 393 × 378; 15 KB
 Detach Portal from Room Icon.png 16 × 16; 338 bytes
 Door Editor.png 1,123 × 498; 35 KB
 Door EditorIcon.png 16 × 16; 341 bytes
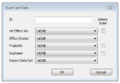 Dual Cast Data Editor.png 399 × 275; 10 KB
 Dual Cast Data EditorIcon.png 16 × 16; 291 bytes
 Edit Redo Icon.png 16 × 16; 298 bytes
 Edit Undo Icon.png 16 × 16; 304 bytes
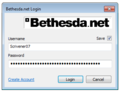 Editor Bethesda Login Window.png 346 × 264; 8 KB
 Editor ObjectWindow.png 810 × 583; 50 KB
 Editor Papyrus Manager Window.png 411 × 719; 36 KB
 Editor RenderWindow.png 1,207 × 573; 1.4 MB
 Editor Toolbar.png 1,417 × 32; 5 KB
 EffectShader EditorIcon.png 16 × 16; 332 bytes
 Enchantment Editor.png 839 × 336; 23 KB
 Enchantment EditorIcon.png 16 × 16; 324 bytes
 Enchantment Effect Item Editor.png 1,123 × 302; 21 KB
 Encounter Zone Analyze Loot Editor.png 444 × 523; 9 KB
 Encounter Zone Editor.png 317 × 427; 11 KB
 Encounter Zone EditorIcon.png 16 × 16; 304 bytes
 Enter Portal Mode Icon.png 16 × 16; 287 bytes
 Equip Slot Editor.png 643 × 741; 27 KB
 Equip Slot EditorIcon.png 16 × 16; 298 bytes
 Explosion Editor.png 459 × 547; 33 KB
 Explosion EditorIcon.png 16 × 16; 346 bytes
 Faction Crime Editor.png 769 × 587; 23 KB
 Faction Editor.png 766 × 585; 35 KB
 Faction EditorIcon.png 16 × 16; 474 bytes
 Faction Rank Editor.png 771 × 588; 15 KB
 Faction Vendor Editor.png 770 × 589; 22 KB
 Flora Editor.png 973 × 507; 53 KB
 Flora EditorIcon.png 16 × 16; 437 bytes
 Footstep EditorIcon.png 16 × 16; 290 bytes
 Footstep Set EditorIcon.png 16 × 16; 310 bytes
 Force Render Window Weather Icon.png 16 × 16; 338 bytes
 FormList Editor.png 310 × 386; 7 KB
 FormList EditorIcon.png 16 × 16; 333 bytes
 Furniture Editor.png 1,495 × 732; 152 KB
 Furniture EditorIcon.png 16 × 16; 325 bytes
 Global Editor.png 229 × 173; 2 KB
 Global EditorIcon.png 16 × 16; 299 bytes
 Go To Selection - PC.png 16 × 16; 394 bytes
 Go To Selection - Xbox.png 16 × 16; 395 bytes
 Grass Editor.png 619 × 198; 6 KB
 Grass EditorIcon.png 16 × 16; 351 bytes
 Hazard Editor.png 460 × 543; 23 KB
 Hazard EditorIcon.png 16 × 16; 282 bytes
 HeadPart Editor.png 759 × 631; 28 KB
 HeadPart EditorIcon.png 16 × 16; 323 bytes
 Holotape Editor.png 695 × 424; 25 KB
 Holotape EditorIcon.png 16 × 16; 454 bytes
 IdleMarker Editor.png 624 × 584; 18 KB
 IdleMarker EditorIcon.png 16 × 16; 337 bytes
 ImageSpace Modifier EditorIcon.png 16 × 16; 299 bytes
 ImpactData EditorIcon.png 16 × 16; 324 bytes
 ImpactDataSet EditorIcon.png 16 × 16; 385 bytes
 Ingredient Editor.png 1,101 × 526; 35 KB
 Ingredient EditorIcon.png 16 × 16; 395 bytes
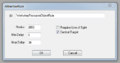
 Instance Naming Rules Editor.png 587 × 505; 26 KB
 Join Rooms Icon.png 16 × 16; 326 bytes
 Join-Break Occlusion Planes Icon.png 16 × 16; 307 bytes
 Key EditorIcon.png 16 × 16; 314 bytes
 Keyword EditorIcon.png 16 × 16; 302 bytes
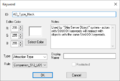 Keyword.png 437 × 295; 7 KB
 Landscape Editing Icon.png 16 × 16; 352 bytes
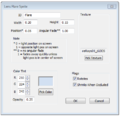
 LandTexture Editor.png 739 × 452; 12 KB
 LandTexture EditorIcon.png 16 × 16; 329 bytes
 Layer Editor.png 546 × 555; 29 KB
 Layer EditorIcon.png 16 × 16; 300 bytes
 Lens Flare Sprite Editor.png 437 × 424; 17 KB
 LensFlare Editor.png 948 × 617; 38 KB
 LeveledCharacter EditorIcon.png 16 × 16; 334 bytes
 LeveledItem Editor.png 937 × 483; 26 KB
 LeveledItem EditorIcon.png 16 × 16; 335 bytes
 LeveledSpell Editor.png 609 × 464; 14 KB
 LeveledSpell EditorIcon.png 16 × 16; 337 bytes
 Light Editor.png 562 × 911; 25 KB
 Light EditorIcon.png 16 × 16; 343 bytes
 Lighting Template EditorIcon.png 16 × 16; 291 bytes
 Link Portal to Room Icon.png 16 × 16; 322 bytes
 LoadScreen Editor.png 742 × 581; 16 KB
 LoadScreen EditorIcon.png 16 × 16; 347 bytes
 Location Actors Editor.png 897 × 644; 36 KB
 Location Cells Editor.png 897 × 644; 29 KB
 Location Editor.png 897 × 644; 39 KB
 Location EditorIcon.png 16 × 16; 282 bytes
 Location LocRefTypes Editor.png 897 × 644; 37 KB
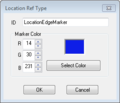 Location Ref Type Editor.png 276 × 236; 6 KB
 Location Ref Type EditorIcon.png 16 × 16; 301 bytes
 Magic Effect Editor.png 1,044 × 853; 71 KB
 Magic Effect EditorIcon.png 16 × 16; 314 bytes
 Material Editor Icon.png 16 × 16; 343 bytes
 Material Object Editor.png 406 × 554; 17 KB
 Material Object EditorIcon.png 16 × 16; 296 bytes


