Toggle Workshop Menu
Overview[edit | edit source]
This tutorial creates a custom Holotape to turn on and off a workshop menu. We'll be creating a simple toggle on and off system that will show a visual of the menu being on or off.
Our plugin is going to be using Namespaces for data folder organization purposes so there is a little more work and double-checking than when not using one. The methodology behind this is that it makes archiving the scripts for upload much easier and creates organization for both the mod creator and mod user.
NOTE: This will not actually add the holotape to the player's inventory. That is beyond the scope of this tutorial.
The reader will learn:
- How to create a Global
- How to create a Terminal for use with holotapes
- How to create and condition terminal entries
- How to create a holotape inventory item
- How to create a conditioned workshop recipe
Creating the Global[edit | edit source]
- In the Object Window, navigate to Miscellaneous > Global.
- Right click in the list of global variables and select "New".
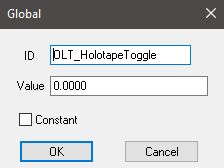
The window brings up the Global form.
- Give the global a memorable name. For purposes of this tutorial, is called
OLT_HolotapeToggle. - Leave the value at 0.0000. This will be our default value for the plugin and everything will be conditioned around this number.
- Click "Ok" to save the record.
Our global is set up and ready for use.
- Save your plugin in.
Creating the Holotape Terminal[edit | edit source]
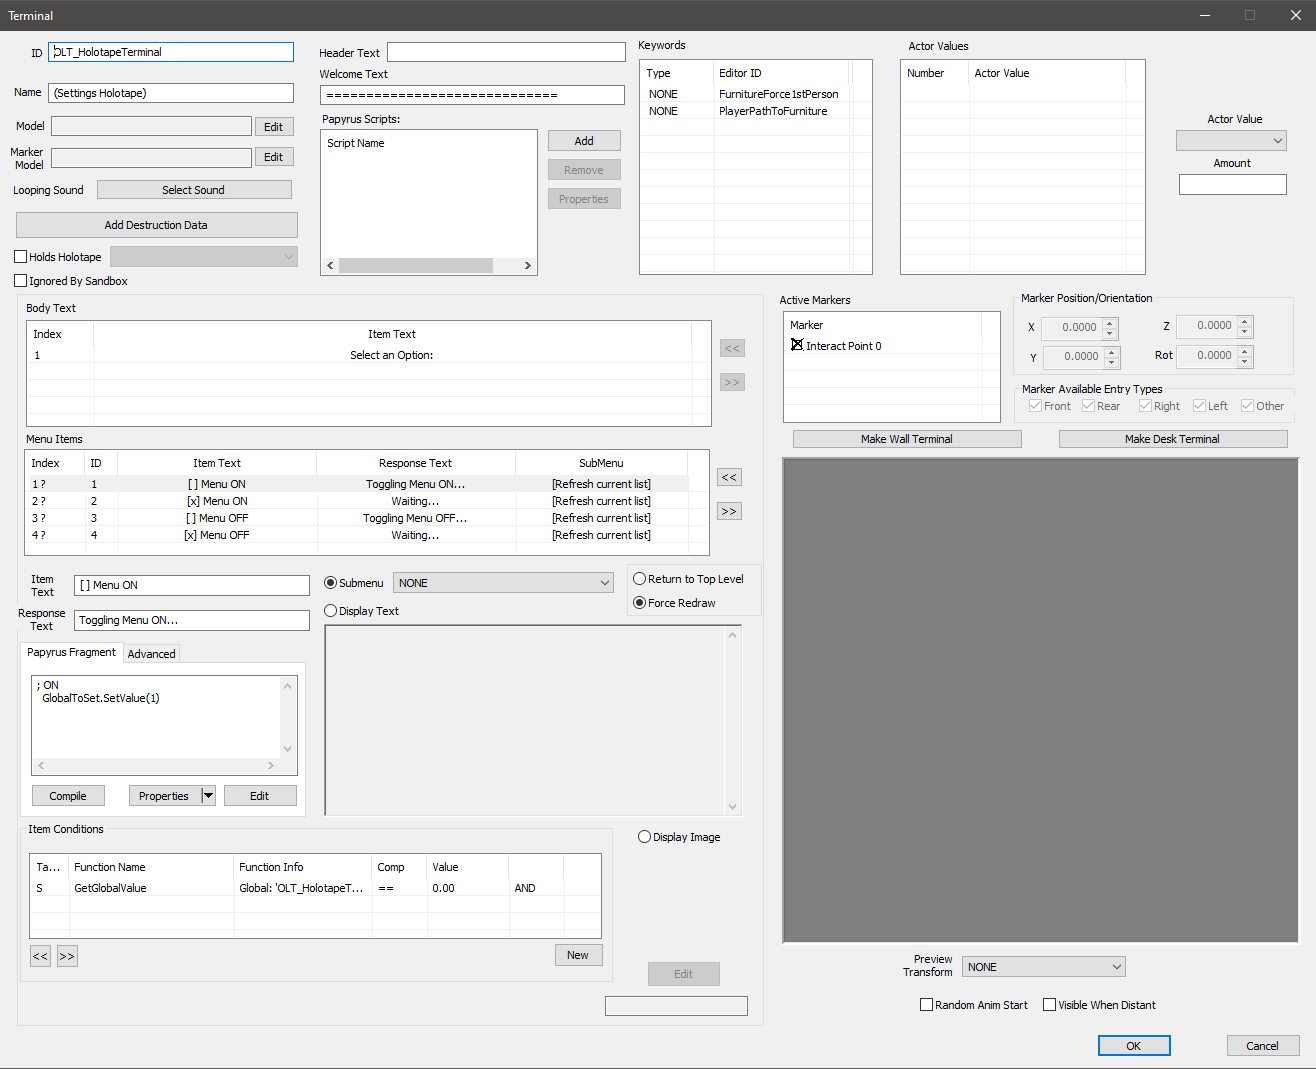
In the Object Window, navigate to World Objects > Terminal. Right click in the list of terminals and select "New".
Model_Files and Markers are not necessary for holotape terminal entries. You can leave these blank. If you wish the terminal to have default Keywords, click "Make Wall Terminal" or "Make Desk Terminal". The Keywords box will autofill with the appropriate defaults.
Give the terminal a memorable name. For purposes of this tutorial, it is called OLT_HolotapeTerminal so that it is easily found in a filter search in the Object Window.
Click "OK" to save the record.
Creating the Terminal Entries[edit | edit source]
Let's set up instructions for the player to follow.
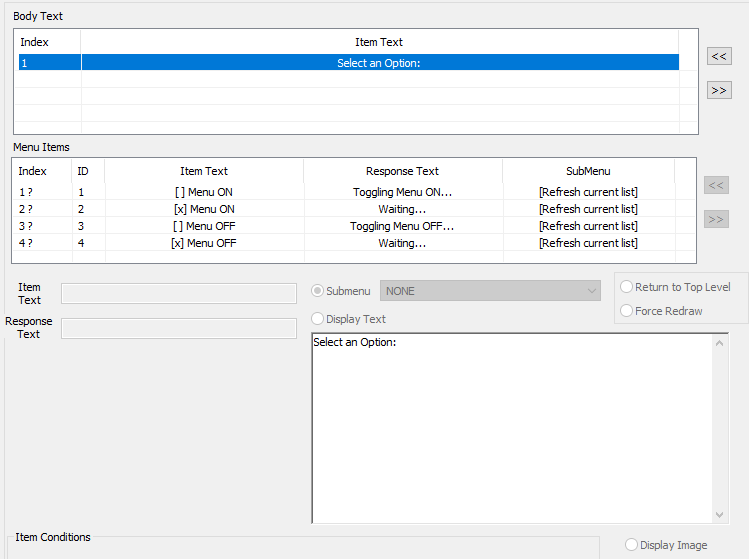
- Navigate to "Body Text" and right click > "New" on the Item Text box.
- Navigate to and click the radial button for Display Text.
- In the box that now highlights, type "Select and option".
Now let's set up our menu toggles. The first two entries will represent the Menu Toggle for ON. The second two entries will represent the Menu Toggle for OFF.
Each entry will need to refresh the current list and be conditioned to show when the global value is 1 or 0. Remember our default is 0.
- Navigate to "Menu Items"
- Create four new entries - Right click on the Menu Items text box and select "New".
- For purposes of this tutorial, the Item Text for the entries is as follows:
[ ] Menu ON
[x] Menu ON
[ ] Menu OFF
[x] Menu OFF
Things to be aware of:
- The first and fourth entries are the default for when the plugin is loaded. They will be shown in the Pip-boy when the player selects the new holotape.
- The first and third entries will have papyrus fragments to toggle the global. We'll be adding those in the next section.
- The second and fourth entries are visual representations of the menus being on or off.
Force redraw will refresh the list each time the player clicks on any entry.
- On each entry created, click Force Redraw Radial.
- Response Text can be anything you like. For purposes of this tutorial:
1 Toggling Menu ON...
2 Waiting...
3 Toggling Menu OFF...
4 Waiting...
- Once you complete the four entries, save and close the terminal record to refresh it.
Creating Conditions on the Menu Items[edit | edit source]
For efficient data entry, we'll be making a singular condition on the first Menu Item and then copying that condition to the others and changing the value as necessary.
- Open the terminal entry.
Menu Entry 1
- Select Index 1 [ ] Menu ON and navigate to Item Conditions > Right click "New".
- Fill in the following information:
Condition Function > GetGlobalVariable
Function Info > OLT_HolotapeToggle
Comparison > ==
Value > 0.0000
- Click "Ok" to save the condition.
- Click on that condition and Right Click > Copy Condition
Menu Entry 2
- Select Index 2 [x] Menu Item ON.
- Navigate to Item Conditions > Right click "Paste Conditions".
- Double-click the condition to bring up the menu.
- Change Value to 1.0000.
- Click "Ok" to save the condition.
Menu Entry 3
- Select Index 3 [ ] Menu Item OFF.
- Navigate to Item Conditions > Right click "Paste Conditions".
- Double-click the condition to bring up the menu.
- Change Value to 1.0000.
- Click "Ok" to save the condition.
Menu Entry 4
- Select Index 4 [x] Menu Item OFF.
- Navigate to Item Conditions > Right click "Paste Conditions". No changes are necessary.
- Click "Ok" to save the condition.
- Save and close the terminal record.
Creating the Papyrus Fragment[edit | edit source]
While this is a very tiny fragment, this is designed to teach the reader how to create new namespaces for fragments and allow the reader to get into the habit of double-checking fragments once renaming.
Things to be aware of:
- You will need to frequently close the terminal record to refresh the papyrus fragment.
- You will need to build the fragment before adding properties by simply adding a comment on the entries that will have a fragment.
- If you move the indices around, the papyrus fragment will assign blank fragment numbers and imaginary fragments to items that will need to be deleted if they are supposed to be blank.
- If you create your default namespace under Preferences and have more than two paths in the custom namespace, the editor will assign an underscore in place of a colon when creating the fragment.
Initial Papyrus creation[edit | edit source]
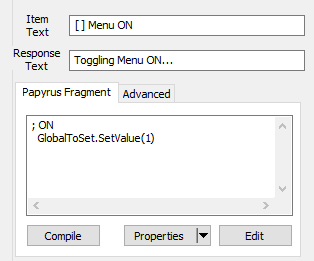
Menu Item 1 and Menu Item 3 are the only entries with fragments.
- Open the terminal record.
Menu Entry 1
- Select Index 1 [ ] Menu ON.
- Create the Papyrus fragment by typing
;ON. - Compile the fragment by clicking "Compile."
Menu Entry 3
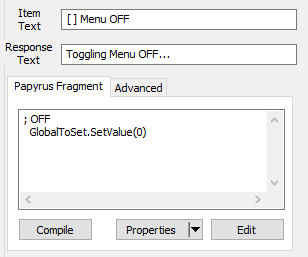
- Select Index 3 [ ] Menu OFF.
- Create the Papyrus fragment by typing
;OFF - Compile the fragment by clicking "Compile"
- Click "Ok" to save and exit the record.
Organizing the Data Folder[edit | edit source]
Now let's move the papyrus fragment out of the default namespace and into one that is exclusive to the plugin.
- Return to the terminal record.
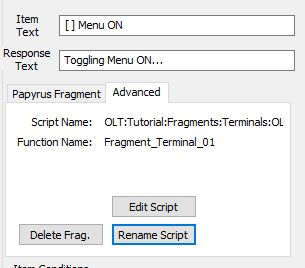
- Select Advanced Tab.
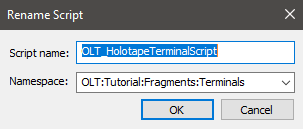
- Click Rename Script.
- For tutorial purposes, in the appropriate text boxes, rename:
- Script Name to
OLT_HolotapeTerminalScript - Namespace to
OLT:Tutorial:Fragments:Terminals
- Script Name to
- Click "Ok" to save. The advance tab should refresh.
- Return to Papyrus Fragment and click "Compile".
- Click "Ok" to save terminal record
Confirm Changes[edit | edit source]
We'll need to confirm any changes and make any corrections.
- Return to the terminal record and examine all Advanced papyrus records and confirm the Namespace has been renamed correctly.
NOTE: If a fragment has attached itself to the second or third entries, select "Delete Frag." to remove the erroneous fragment.
- If any changes, click "Ok" to save and exit.
Create New Properties[edit | edit source]
Now we are finally ready to create a property and two tiny fragments!
- Return to the terminal record.
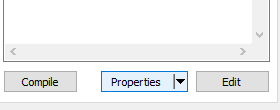
- Click "Properties" to bring up the Properties Dialogue
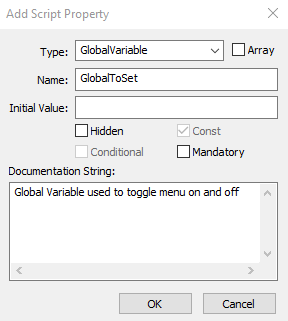
- Click "Add Property" on the Properties Dialogue
- In the Add Script Property Dialogue, add the following:
Property: GlobalVariable
Name: GlobalToSet
- Click to save the new property.
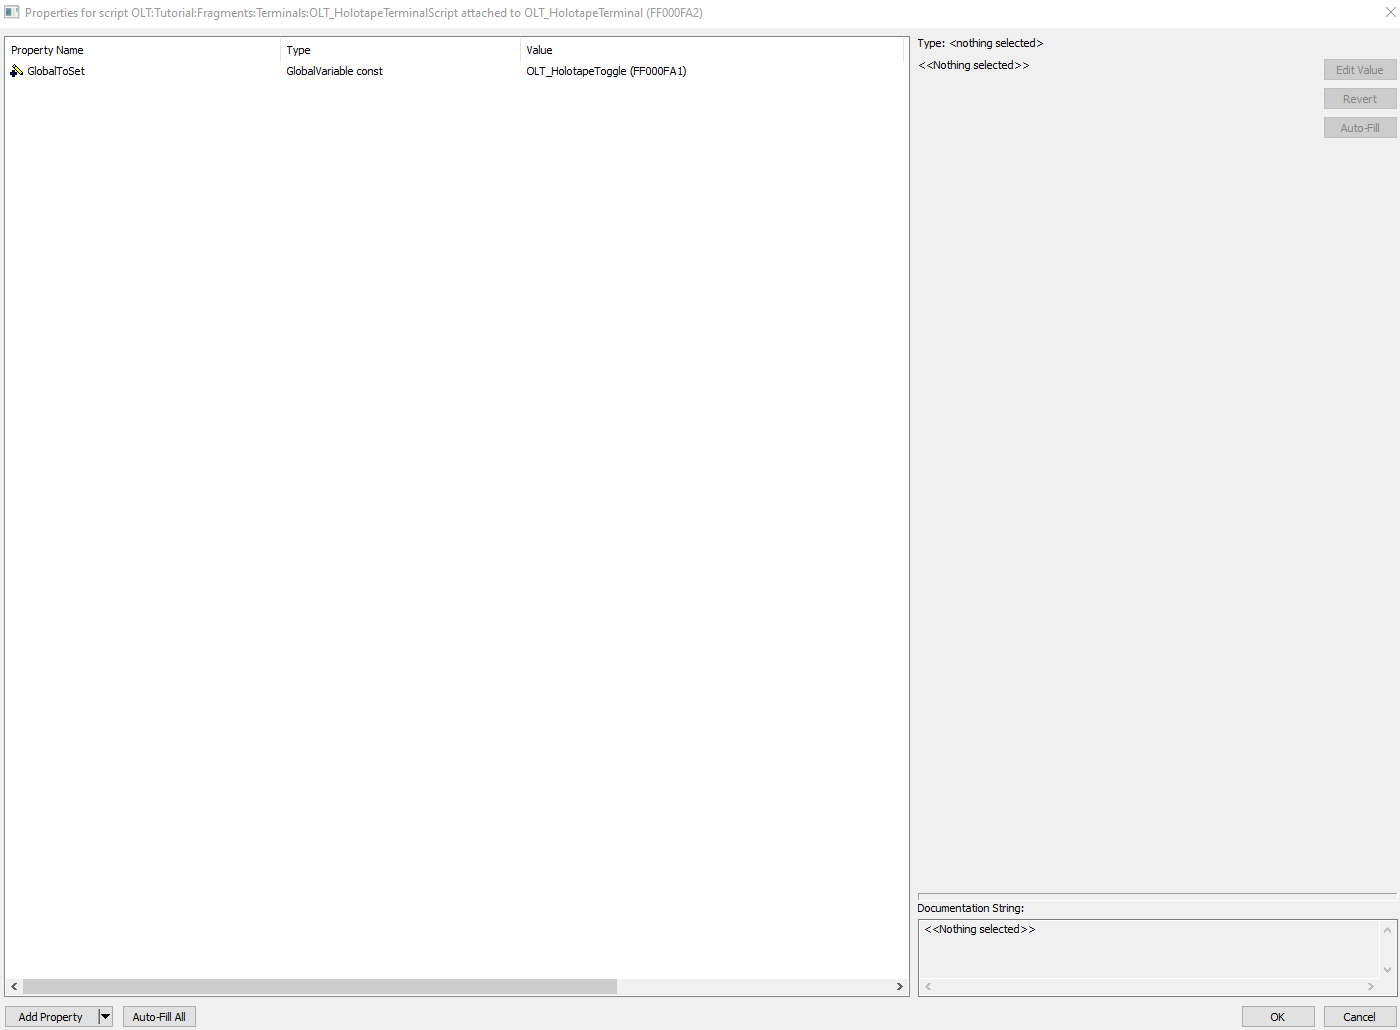
- On the Properties dialogue, select GlobalToSet and check filter to bring up the search filter.
- Find
OLT_HolotapeTogglein the drop down menu, double-check that the property fills, and click "Ok" to save and exit the Properties dialogue.
Compling Papyrus[edit | edit source]
Now let's write the actual fragment. It uses SetValue_-_GlobalVariable to set the Global Variable.
Menu Entry 1
- Select Index 1 [ ] Menu ON.
- Beneath the previous code, add the following
GlobalToSet.SetValue(1)- Compile the fragment by clicking "Compile."
Menu Entry 3
- Select Index 3 [ ] Menu OFF.
- Beneath the previous code, add the following
GlobalToSet.SetValue(0)- Compile the fragment by clicking "Compile"
- Click "Ok" to save and exit the record.
We have completed all entries for the terminal record. We will now be creating the holotape menu item and then conditioning the workshop recipe to only appear when the menu is toggled on.
Creating the Holotape Inventory Object[edit | edit source]
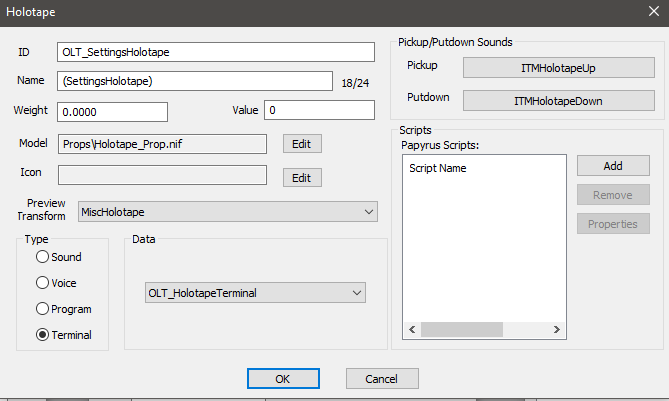
You can create a holotape inventory object one of two ways, item duplication or creating as new and filling in all the fields. For tutorial purposes, we'll be duplicating a record.
Note
Previous versions of the CK made item duplication more tedious by adding an identical to master record to the plugin.
If using item duplication, it is advised to view the completed mod in xEdit to make sure that it is clear of any identical to master records as part of good modding practices.
- In the Object Window, navigate to Items > Holotape.
- Double-click
DN070_HolotapeTreasuresInventory. The radial for Terminal is already checked for this record. - Change the ID to
OLT_SettingsHolotape - Give it a name.
Keep in mind that Book, Note, and Holotape Inventory Objects are alphanumeric by name in the player's inventory. There are several sorting mods available on both Xbox and PC that you can study to make this holotape compatible with.
- In the Data dropdown menu find the terminal record you just created.
- Click "Ok" and "Yes" to the pop up that asks to create a new form.
The holotape inventory object has been created and now it's time to set up the example COBJ and condition the recipe to toggle on and off in the menu.
Creating the Workshop Object[edit | edit source]
COBJs for full menus or individual menu items can be toggled. Keyword-controlled menus will need a global placed on every COBJ with the same menu keyword to effectively turn off that menu. Formlist-controlled menus should only need the global placed on the primary menu COBJ.
For purposes of this tutorial, we'll be duplicating an existing workshop item in order to create our conditioned recipe for it.
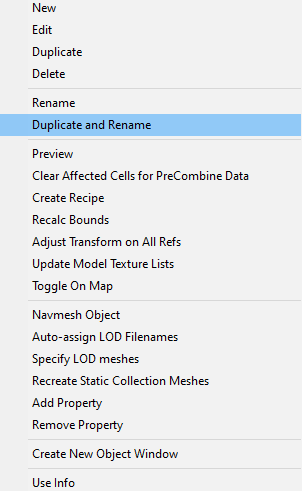
- In the Object Window, filter for workshop_PictureFrame02A.
- Right Click > Duplicate and Rename > Prefix: OLT_
- Click "Ok" to duplicate and rename our workshop object.
Creating the Workshop Object Recipe[edit | edit source]
Now that we have our item, let's create the recipe. The recipe we're creating will be toggling on and off from the Ball Track Menu.
- Select OLT_workshop_PictureFrame02A
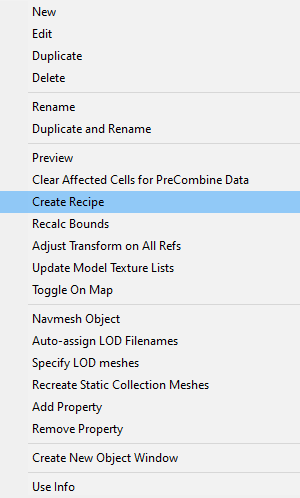
- Right Click > Create Recipe
- In the Object Window, filter for our unique Prefix: "OLT_". If all items created do not show up, select "All".
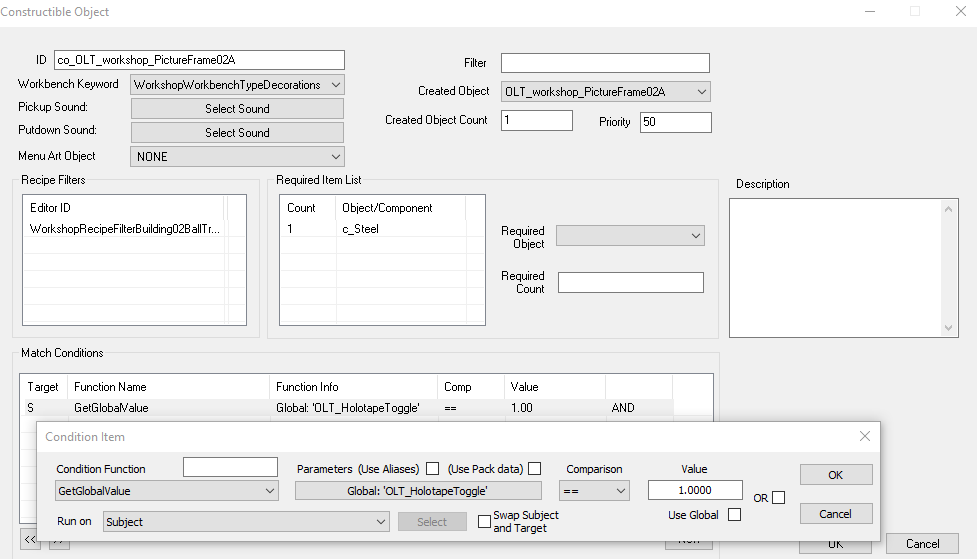
- Double-click co_OLT_workshop_PictureFrame02A
- Set the Priority to 50 so that it shows up at the very end of the menu for testing purposes.
- From the drop down menu, add Workbench Keyword > WorkshopWorkbenchTypeDecorations.
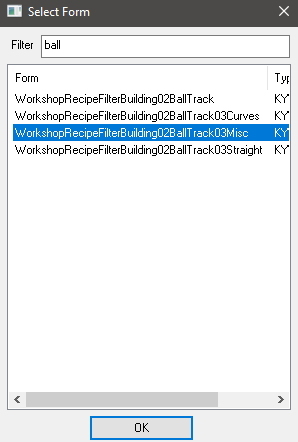
- Recipe Filters text box: Right Click > "Add" and filter for WorkshopRecipeFilterBuilding02BallTrack03Misc. Select the keyword and click "Ok".
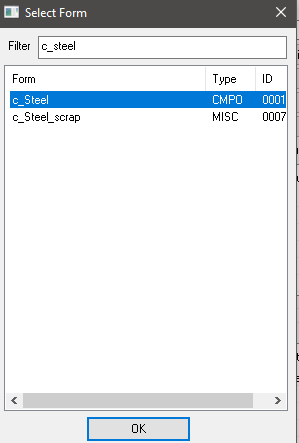
- Required Item List text box: Right Click > "Add" and filter for c_steel. Select the item in the list and click "Ok". At the secondary prompt, fill in 1 as a value and click "Ok".
Conditioning the recipe[edit | edit source]
We'll be pasting in the condition from the terminal entry.
- On the Match Conditions text box, right click > "Paste Conditions".
- Double-click the new condition and change the Value to 1.0000. This will make this recipe conditioned to only show up if the global is 0.0, the default value of the Global Variable.
- Click "Ok" to save the conditon and "Ok" to save and exit the Constructable Object form.
- Save your plugin.
- Make note of the form ID of the holotape inventory object. The tutorial Form ID is 0x00000FA6.
Test Your Plugin[edit | edit source]
To test in game, load a test character into a workshop and examine the Ball Track miscellaneous menu.
To add the holotape to your test character inventory via console:
~ player.additem xx000FA6 1
(Change xx to the number of your plugin in your load order. Change the Form ID to match the Form ID of the holotape in your new plugin.)
Things to be aware of:
- Debug console is not available to Xbox players or survival mode players, and is not advised for normal gameplay.
- In order to give the player the holotape, you will need to script it into their inventory with a quest. If you do not intend to make the holotape persistent so they will not lose it, then the settings tape will need to be craftable. There are several tutorials already available both on the CK wiki and on other sites for adding an item to the player's inventory as well as a default script that can be renamed and customized to suit your purposes.
- The player inventory resets several times prior to receiving the Pip-boy during the prologue. See OnMenuOpenCloseEvent to script a bypass. As of Creation Kit version 1.10.162.0, you can also attach StartAfterCharGenScript to your quest in order to make sure the player has received the Pip-boy. It is a modders' resource provided by Bethesda. It is located under
Data\Scripts\Source\Base\CreationClubin your data folder.
This completes the tutorial.
